You can find the previous article here:

Power Platform ALM: Building Basic Solution Deployment Pipelines - Step by Step Guide
I had an opportunity to use "Pipelines," a new management tool in Power Platform, so I'll document how to use it.What We...
GitHub Commit Integration
We’ll extend the Power Platform deployment pipeline we created previously to commit solutions to GitHub. While the process generally follows the official documentation, some modifications are necessary.Official Documentation:

Extend pipelines using GitHub Actions - Power Platform
Download, unpack, and commit a solution using a GitHub workflow called from a Power Automate Flow.
Implementation Steps
Follow these steps to set up the integration:
- Register an application in Entra ID (formerly Azure AD)
- Add an application user to your Power Platform environment
- GitHub: Create a repository and set up Actions
- GitHub: Generate an access token
- Build Power Automate flow: Configure GitHub API calls
Entra ID Registration
First, let’s start with Entra ID registration. During this process, make note of these three values:
- Client Secret
- Client ID (Application ID)
- Tenant ID
Begin by opening Entra ID in the Azure Portal
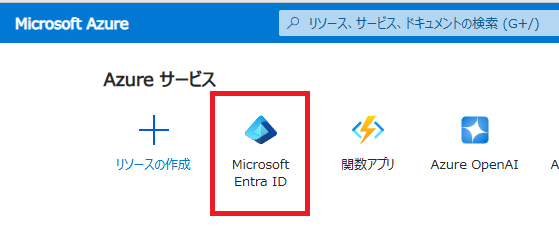

Select [App registrations] and click [New registration] 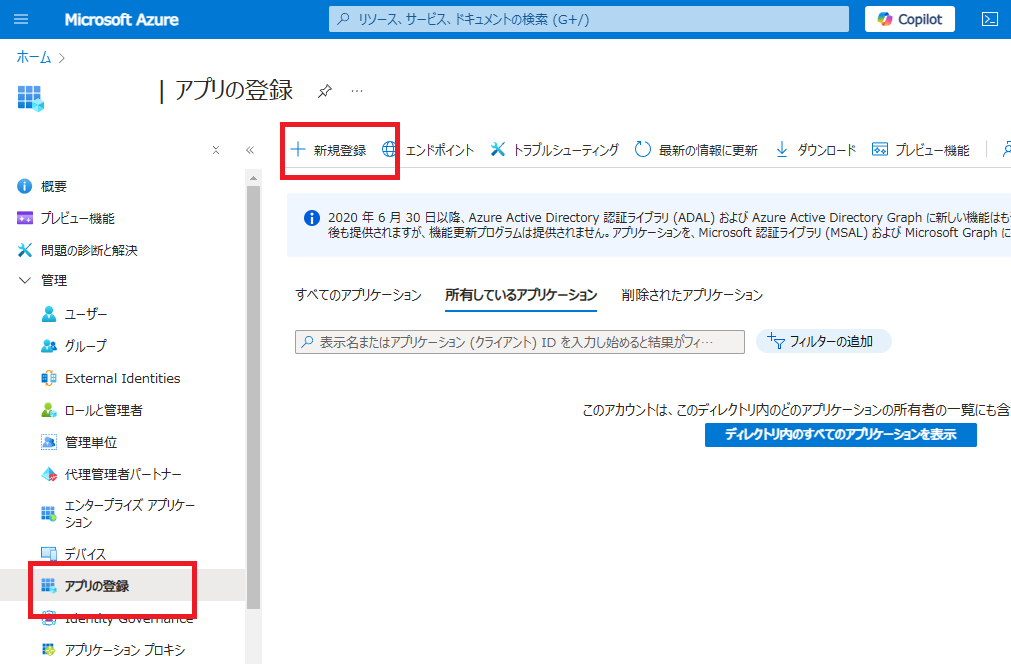

Enter an appropriate name and register it as a single-tenant application. 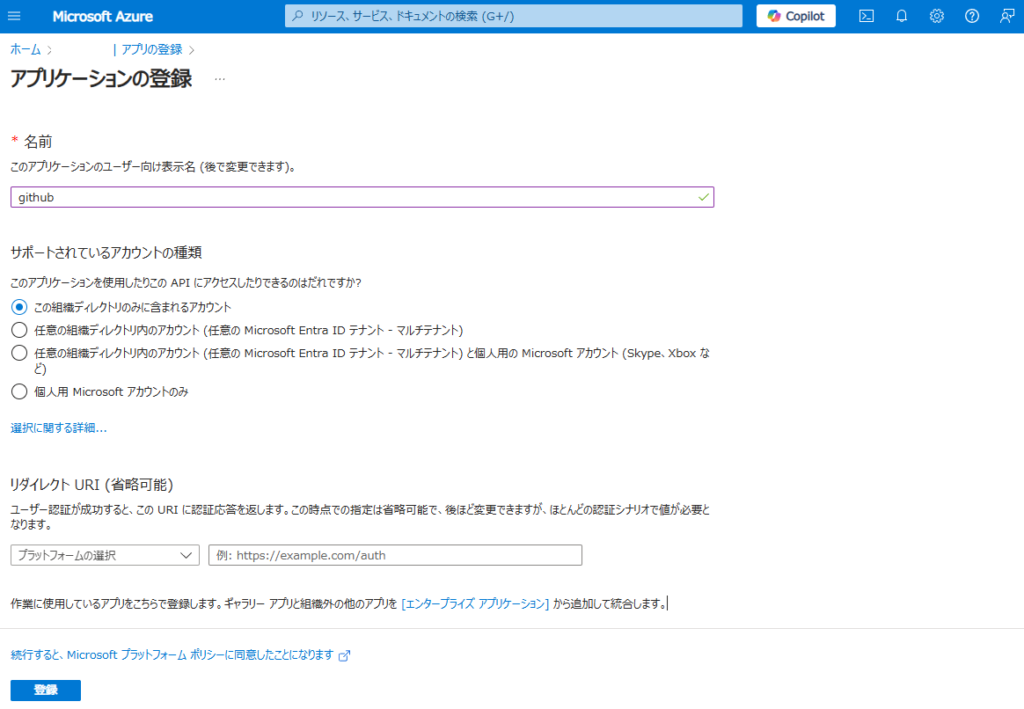

Next, go to [API permissions] of the registered app and select [Dynamics CRM] 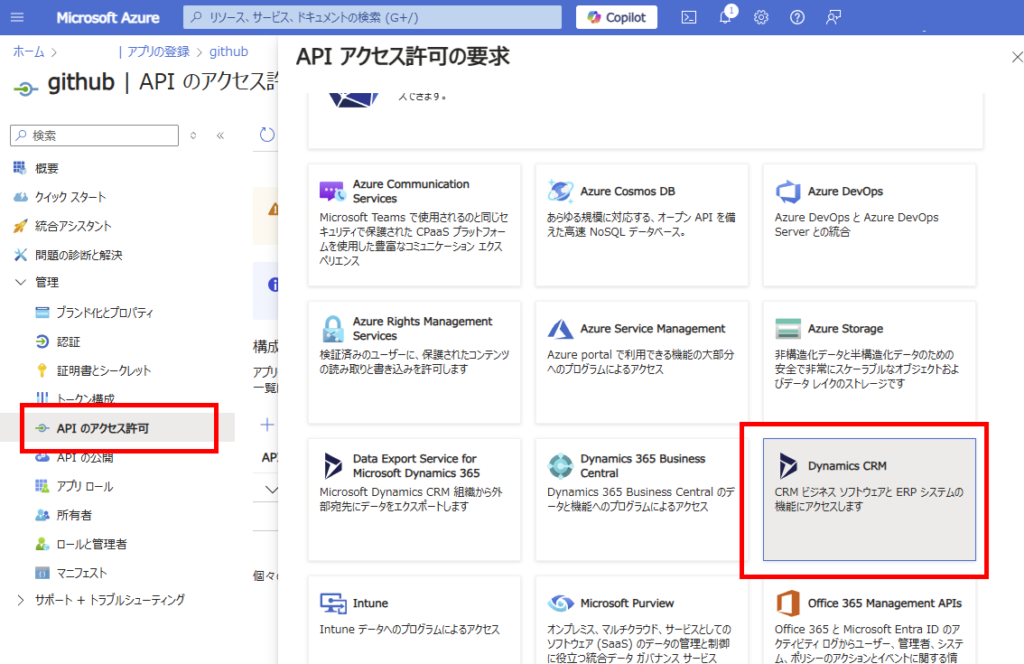

Check “user_impersonation” and click [Add permissions] 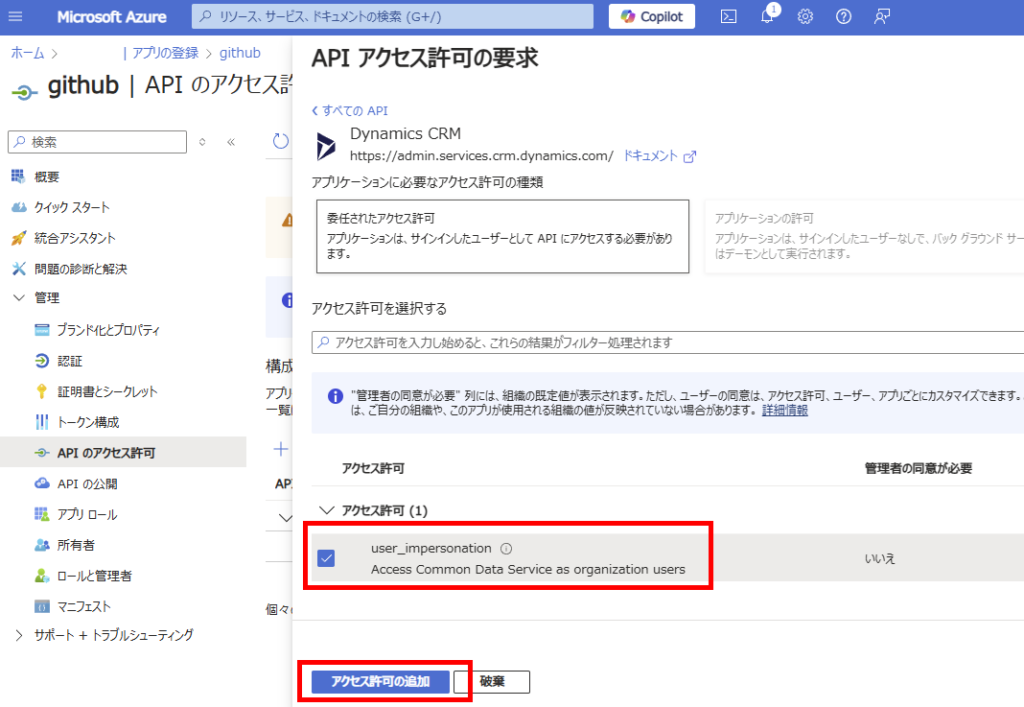

Go to [Certificates & secrets] and select [New client secret] 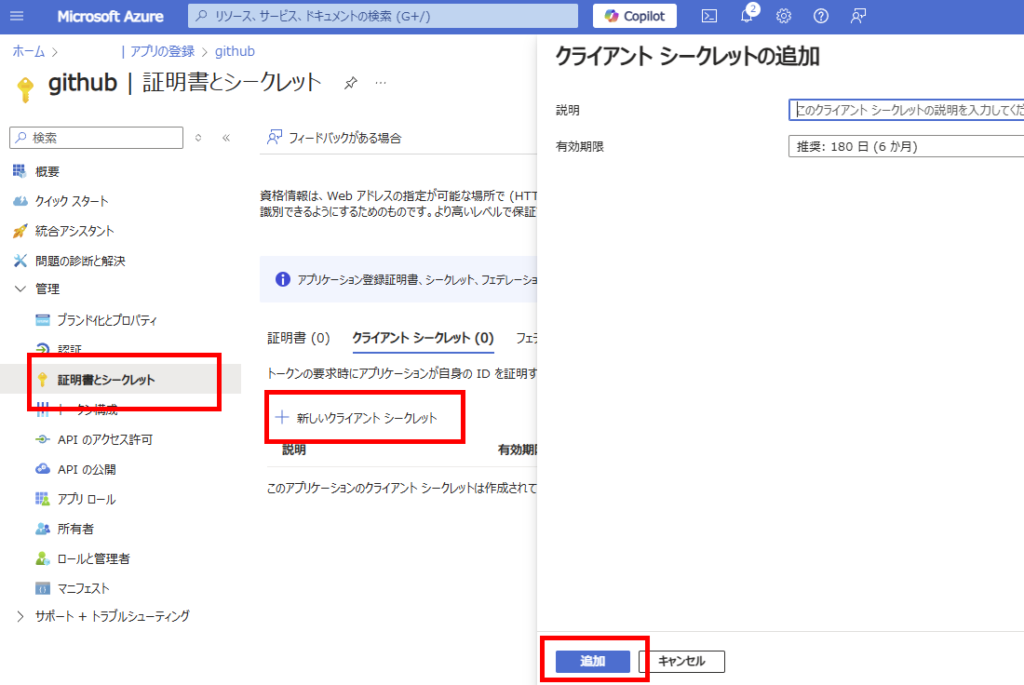

Make note of the generated value 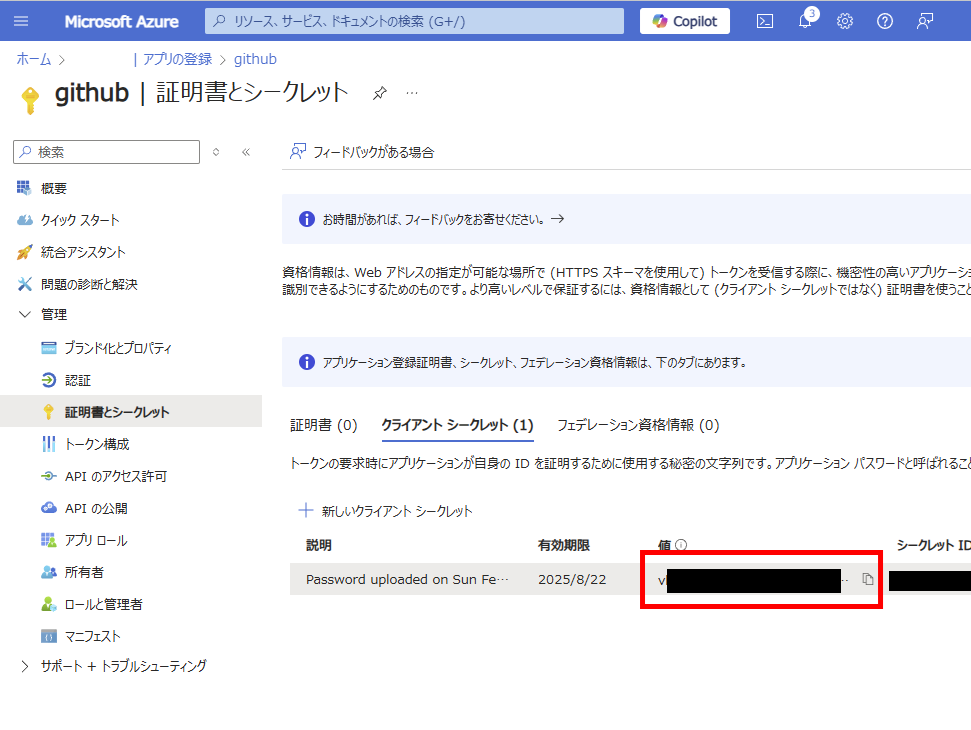

Finally, go to [Overview] and note down both the [Application ID] and [Tenant ID]. This completes this section. 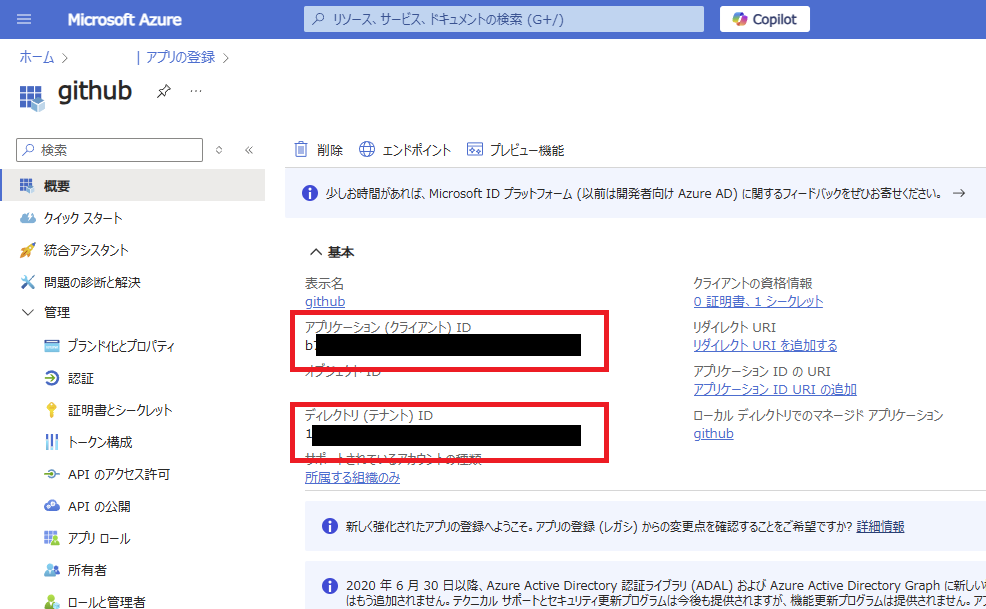

Registering an Application User in Power Platform Environment
Next, we’ll create an application user in the Power Platform environment and assign Dataverse security roles for GitHub integration.In the Power Platform admin center, select the environment where you built the pipeline and click [Settings]. 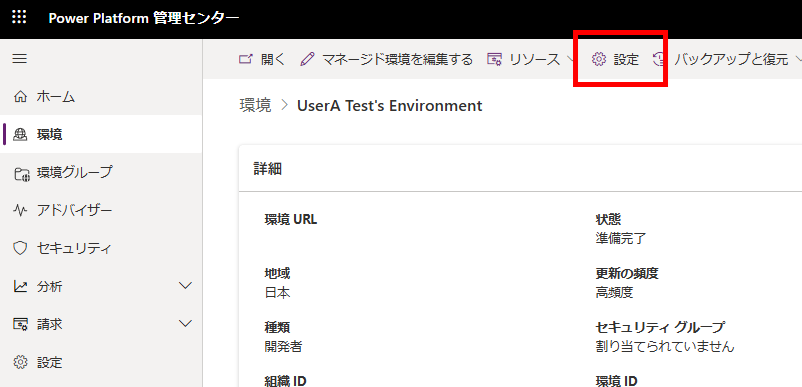

Select [Application users] 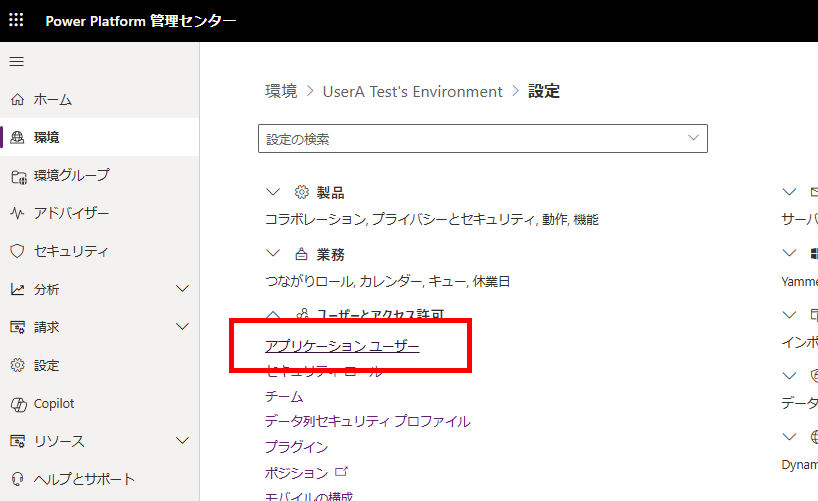

Click [New app user], then [Add an app] 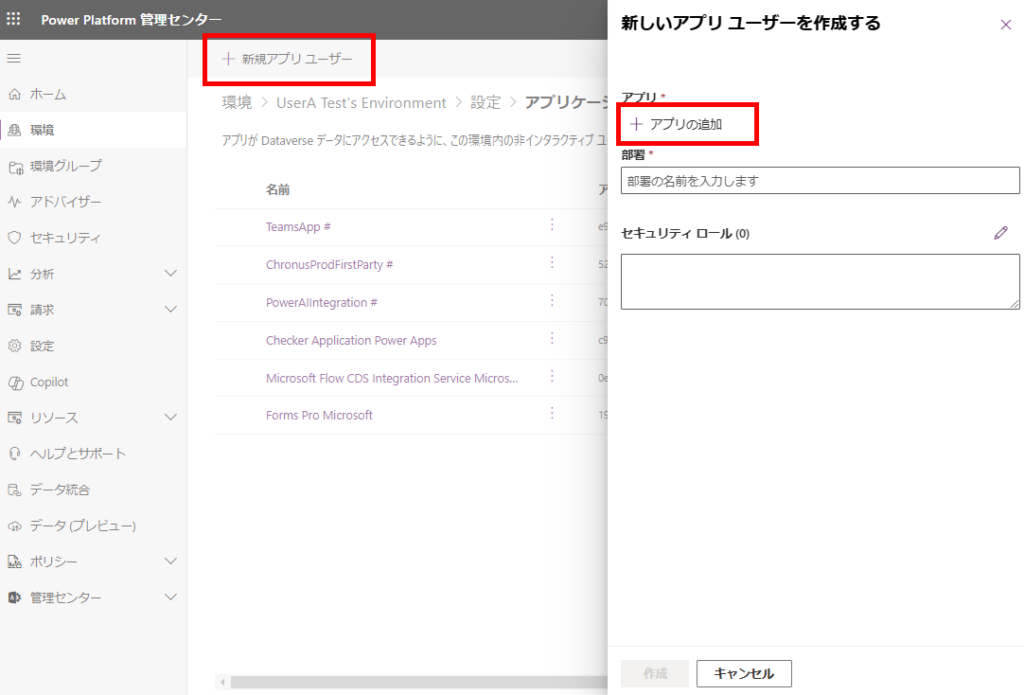

Select the application you registered in Entra ID from the previous steps. 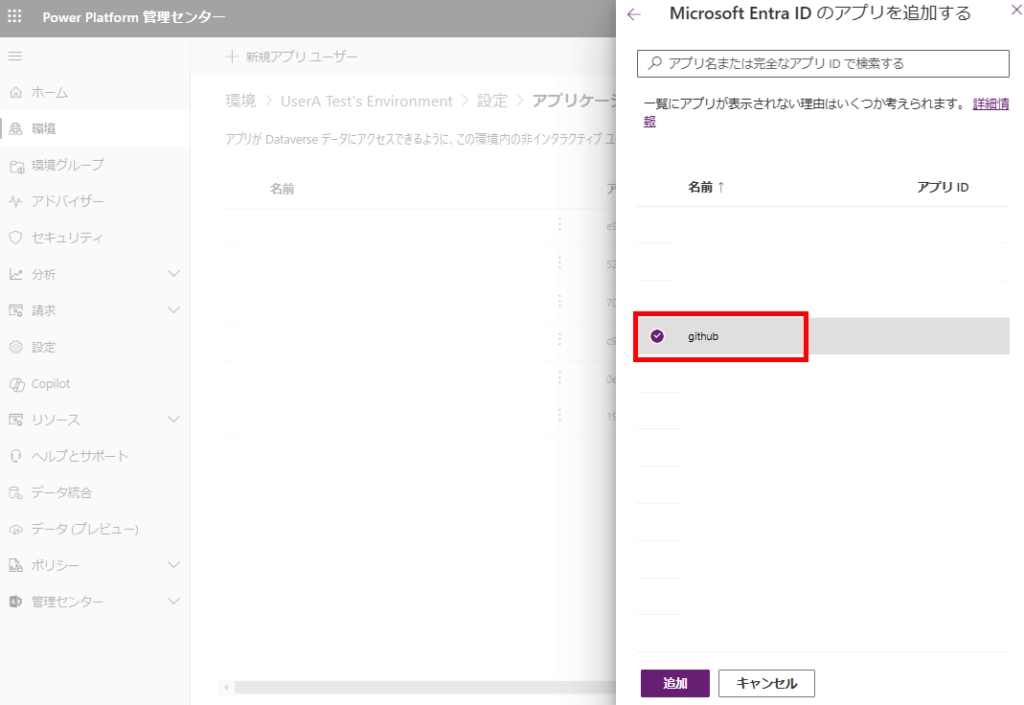

Set the business unit (in this example, we’re using the root business unit) and security role, then click [Create].
Note: While the System Customizer role will definitely work, it’s recommended to create a custom role if you want to minimize permissions.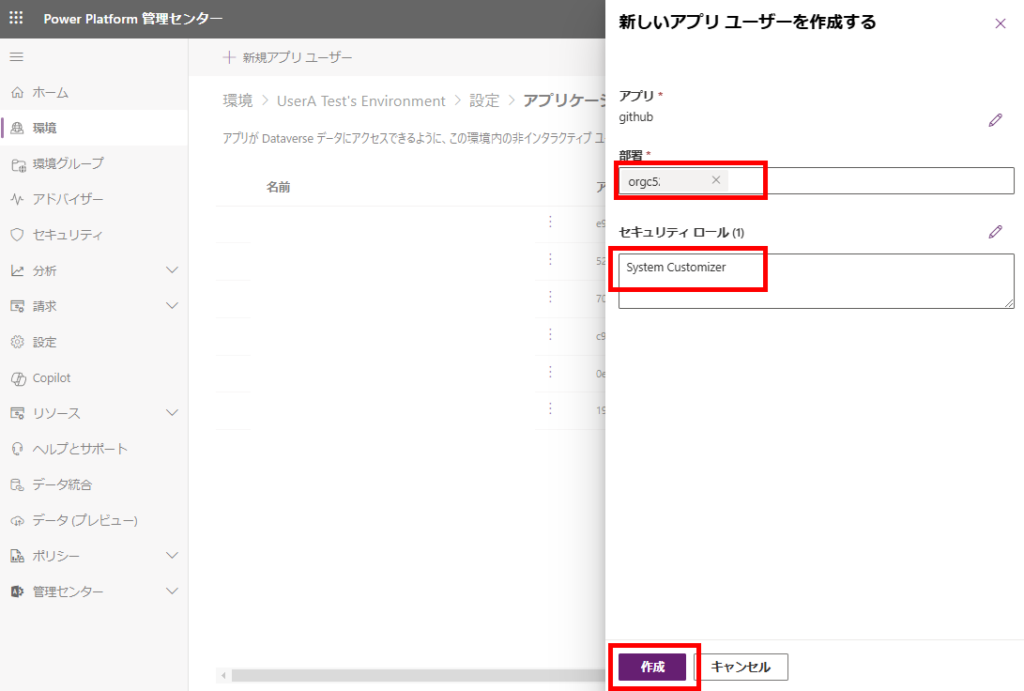
This completes the application user registration in your Power Platform environment.
Note: While the System Customizer role will definitely work, it’s recommended to create a custom role if you want to minimize permissions.

GitHub: Creating Repository and Setting Up Actions
Repository Creation
Navigate to GitHub and create a new repository. 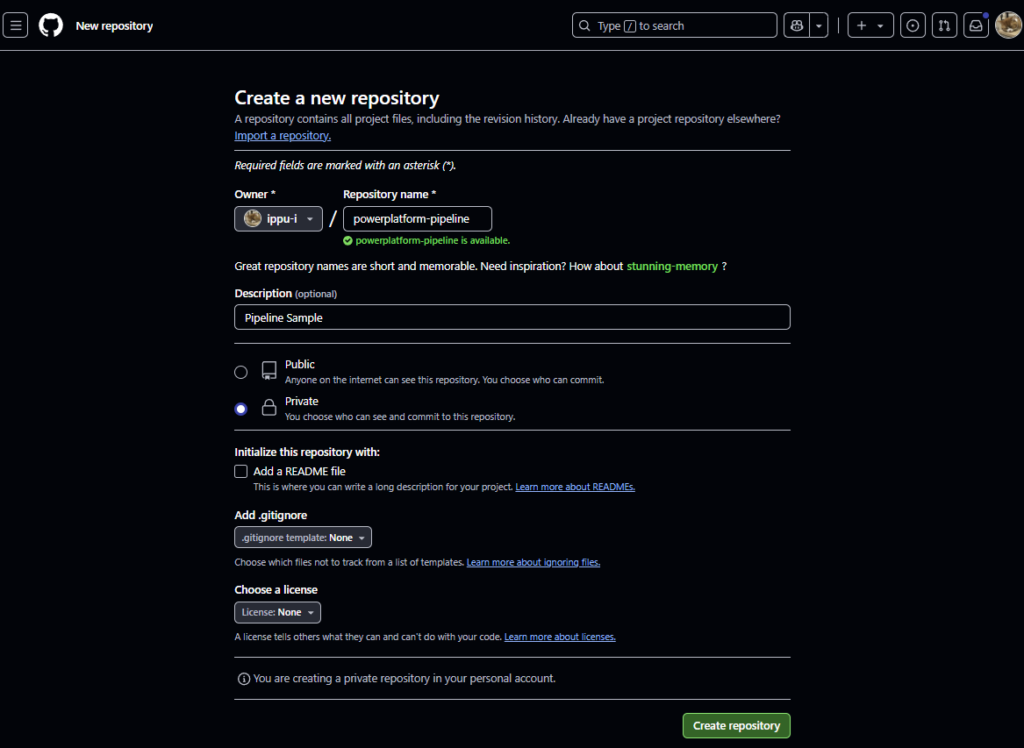

Actions Configuration
After creating the repository, go to Actions and select [set up a workflow yourself]. 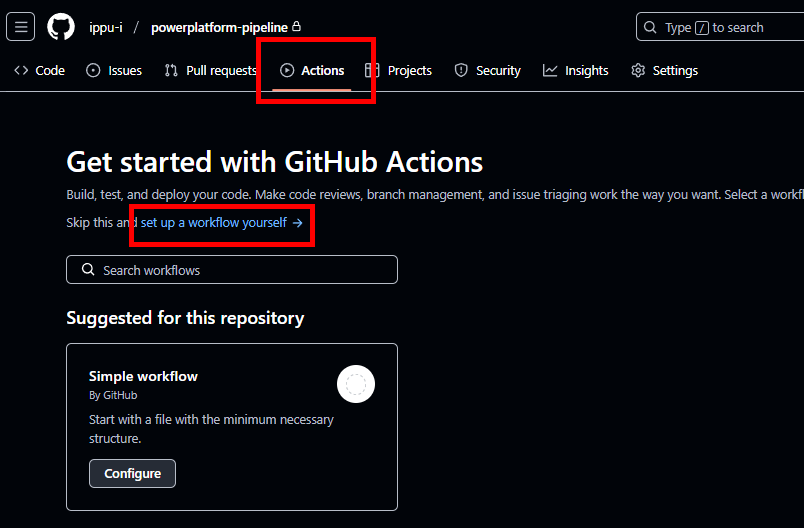

Then, paste the following modified version of the official code and click [Commit changes]. This code includes our specific modifications to the original. 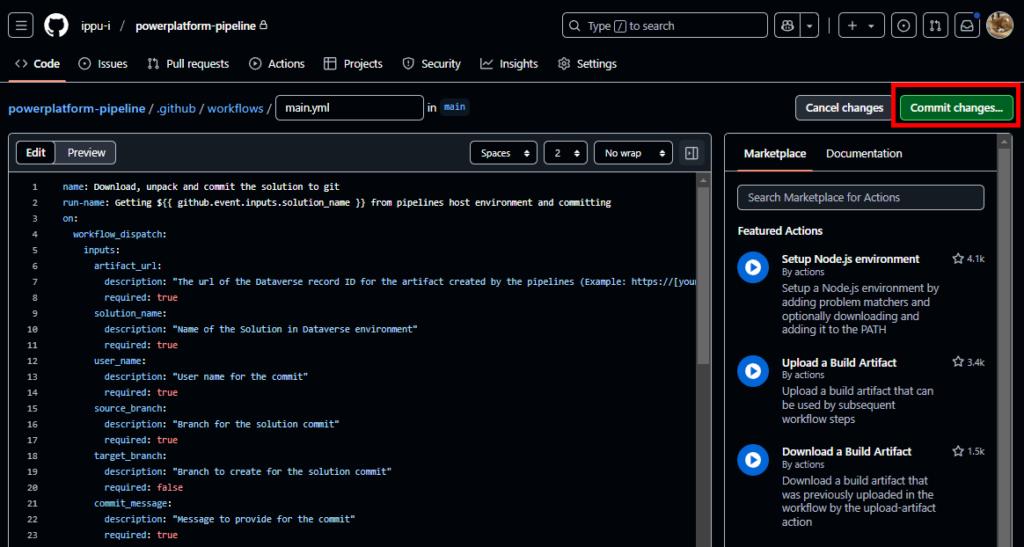
The code modifications are as follows:

# Before
      # Unpack the solution
      - name: unpack solution
        uses: microsoft/powerplatform-actions/unpack-solution@v0
        with:
          solution-file: "${{ github.event.inputs.solution_name }}.zip"
          solution-folder: "${{ github.event.repository.name }}"
          solution-type: 'Both'
          process-canvas-apps: false
          overwrite-files: true

# After the change (v1 was used because the unpack-solution did not work with v0)
      # Install PAC
      - name: Install Power Platform Tools
        uses: microsoft/powerplatform-actions/actions-install@v1

      # Unpack the solution
      - name: unpack solution
        uses: microsoft/powerplatform-actions/unpack-solution@v1
        with:
          solution-file: "${{ github.event.inputs.solution_name }}.zip"
          solution-folder: "${{ github.event.repository.name }}"
          solution-type: 'Both'
          process-canvas-apps: false
          overwrite-files: true
Below is the full source code.
name: Download, unpack and commit the solution to git
run-name: Getting ${{ github.event.inputs.solution_name }} from pipelines host environment and committing
on:
  workflow_dispatch:
    inputs:
      artifact_url:
        description: "The url of the Dataverse record ID for the artifact created by the pipelines (Example: https://[your-env].crm.dynamics.com/api/data/v9.0/deploymentartifacts([your-artifact-id])/artifactfile/$value)."
        required: true
      solution_name:
        description: "Name of the Solution in Dataverse environment"
        required: true
      user_name:
        description: "User name for the commit"
        required: true
      source_branch:
        description: "Branch for the solution commit"
        required: true
      target_branch:
        description: "Branch to create for the solution commit"
        required: false
      commit_message:
        description: "Message to provide for the commit"
        required: true
permissions:
  contents: write
jobs:
  export-unpack-commit:
    runs-on: ubuntu-latest

    steps:
      - uses: actions/checkout@v3
        with:
            ref: ${{ github.event.inputs.source_branch }}

      # Commit changes to the existing or new branch
      - name: create new branch if specified
        shell: pwsh
        run: |
            if('${{ github.event.inputs.target_branch }}' -ne '') {
                git checkout -b ${{ github.event.inputs.target_branch }} ${{ github.event.inputs.source_branch }}
            }

      # Export the solution from the artifact created by pipelines
      - name: download solution from artifact
        env:
            CLIENT_ID: ${{secrets.CLIENT_ID}}
            TENANT_ID: ${{secrets.TENANT_ID}}
            CLIENT_SECRET: ${{secrets.CLIENT_SECRET}}
        shell: pwsh
        run: |
            $aadHost = "login.microsoftonline.com"
            $url = "${{ github.event.inputs.artifact_url }}"
            $options = [System.StringSplitOptions]::RemoveEmptyEntries
            $dataverseHost = $url.Split("://", $options)[1].Split("/")[0]

            $body = @{client_id = $env:CLIENT_ID; client_secret = $env:CLIENT_SECRET; grant_type = "client_credentials"; scope = "https://$dataverseHost/.default"; }
            $OAuthReq = Invoke-RestMethod -Method Post -Uri "https://$aadHost/$env:TENANT_ID/oauth2/v2.0/token" -Body $body
            $spnToken = $OAuthReq.access_token
            $headers = New-Object "System.Collections.Generic.Dictionary[[String],[String]]"
            $headers.Add("Authorization", "Bearer $spnToken")
            $headers.Add("Content-Type", "application/json")

            # Download the managed solution
            $response = Invoke-RestMethod "${{ github.event.inputs.artifact_url }}" -Method 'GET' -Headers $headers
            $bytes = [Convert]::FromBase64String($response.value)
            [IO.File]::WriteAllBytes("${{ github.event.inputs.solution_name }}_managed.zip", $bytes)

            # Download the unmanaged solution (for now we will need to use string manipulation to get the unmanaged solution URL, until the API provides this value)
            $unmanaged_artifact_url = "${{ github.event.inputs.artifact_url }}".Replace("artifactfile", "artifactfileunmanaged")
            $response = Invoke-RestMethod "$unmanaged_artifact_url" -Method 'GET' -Headers $headers
            $bytes = [Convert]::FromBase64String($response.value)
            [IO.File]::WriteAllBytes("${{ github.event.inputs.solution_name }}.zip", $bytes)

      # Install PAC
      - name: Install Power Platform Tools
        uses: microsoft/powerplatform-actions/actions-install@v1

      # Unpack the solution
      - name: unpack solution
        uses: microsoft/powerplatform-actions/unpack-solution@v1
        with:
          solution-file: "${{ github.event.inputs.solution_name }}.zip"
          solution-folder: "${{ github.event.repository.name }}"
          solution-type: 'Both'
          process-canvas-apps: false
          overwrite-files: true

      # Commit changes to the existing or new branch
      - name: commit changes
        shell: pwsh
        run: |
          rm -rf ${{ github.event.inputs.solution_name }}.zip
          rm -rf ${{ github.event.inputs.solution_name }}_managed.zip
          git config user.name ${{ github.event.inputs.user_name }}
          git pull
          git add --all
          git commit -am "${{ github.event.inputs.commit_message }}" --allow-empty

      # Push the committed changes to the source branch
      - name: push to branch
        shell: pwsh
        run: |
          if('${{ github.event.inputs.target_branch }}' -ne '') {
              git push origin ${{ github.event.inputs.target_branch }}
          } else {
              git push origin ${{ github.event.inputs.source_branch }}
          }
Registering Repository Secrets
Open [Settings] in your repository, navigate to [Secrets and variables] > [Actions], and select [New repository secret]. 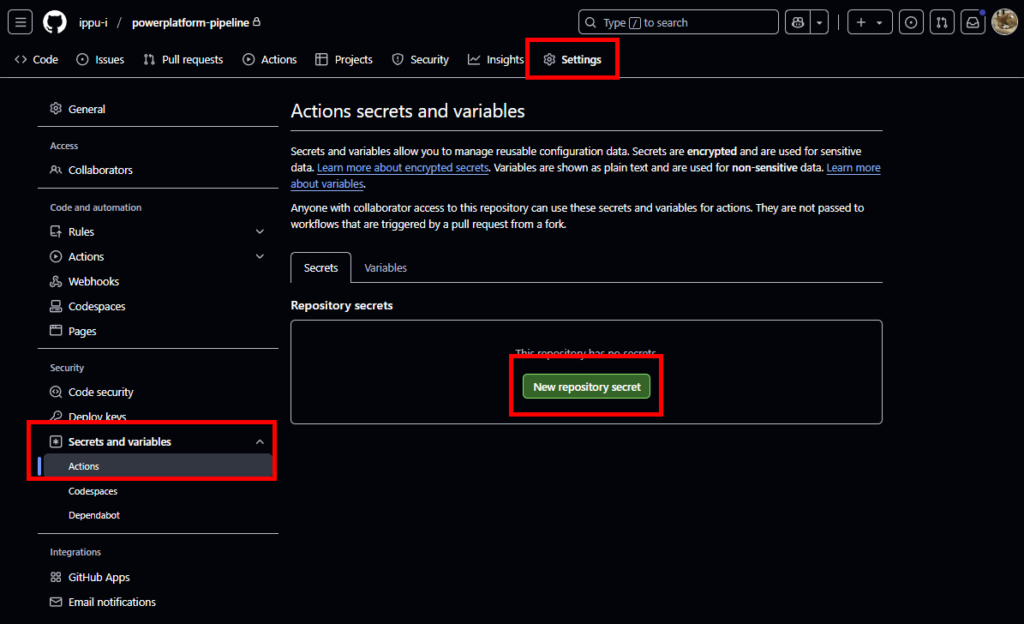

Configure the three values you noted during Entra ID setup: 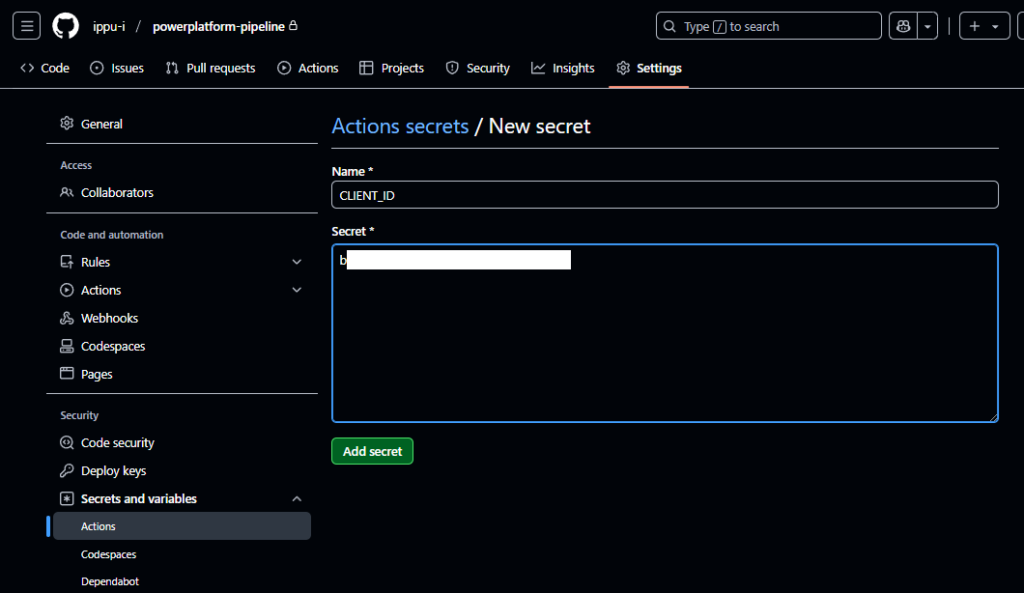
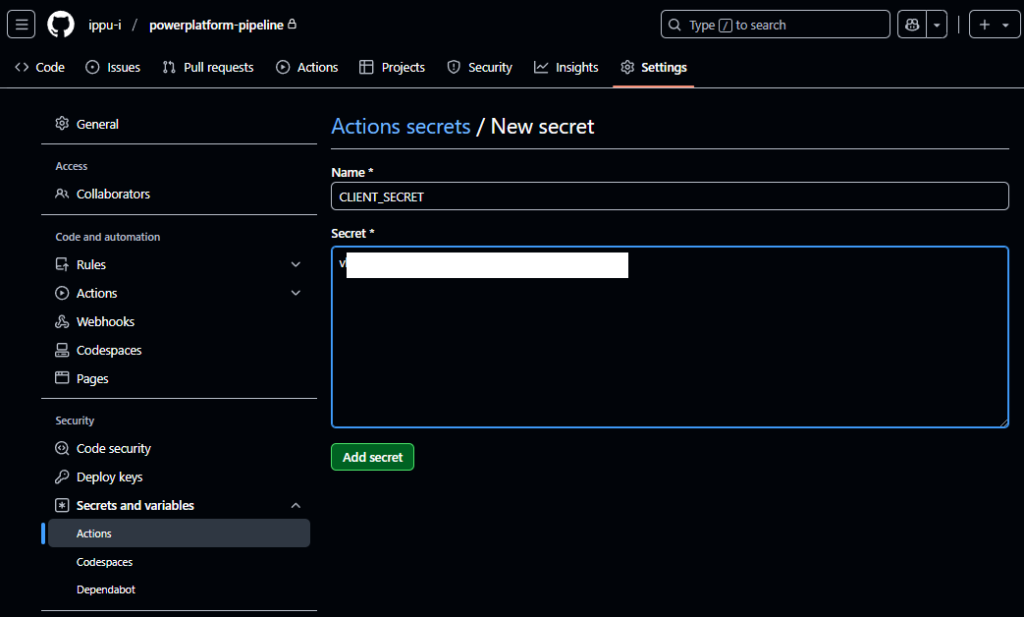
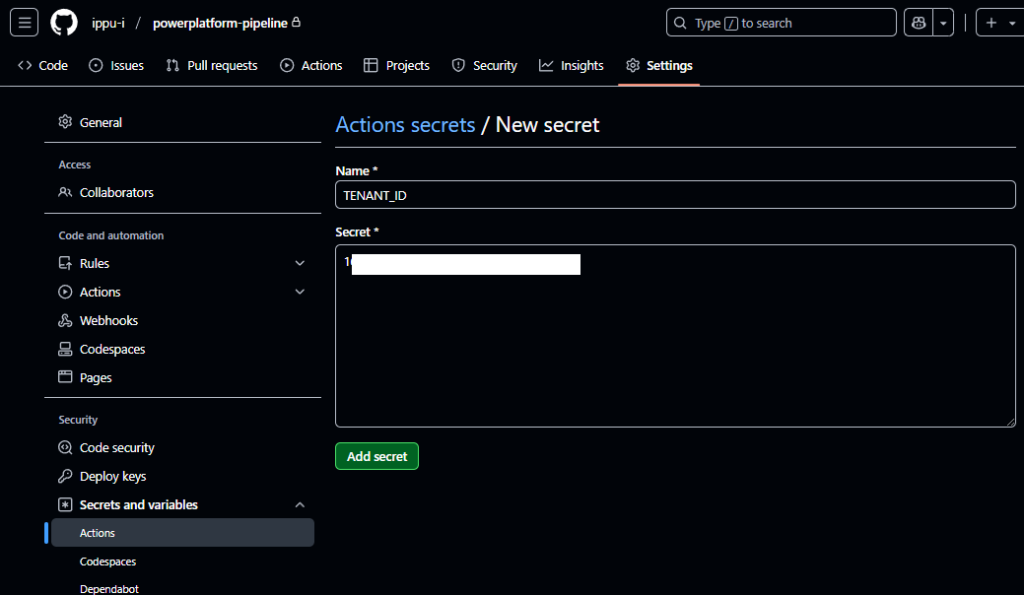
This completes the repository and Actions configuration setup.
- CLIENT_ID: Your Client ID
- CLIENT_SECRET: Your Secret value
- TENANT_ID: Your Tenant ID


GitHub: Creating Access Token
Open your GitHub tenant (user) settings, navigate to [Developer Settings] > [Personal access tokens] > [Fine-grained tokens], and click [Generate new token]. 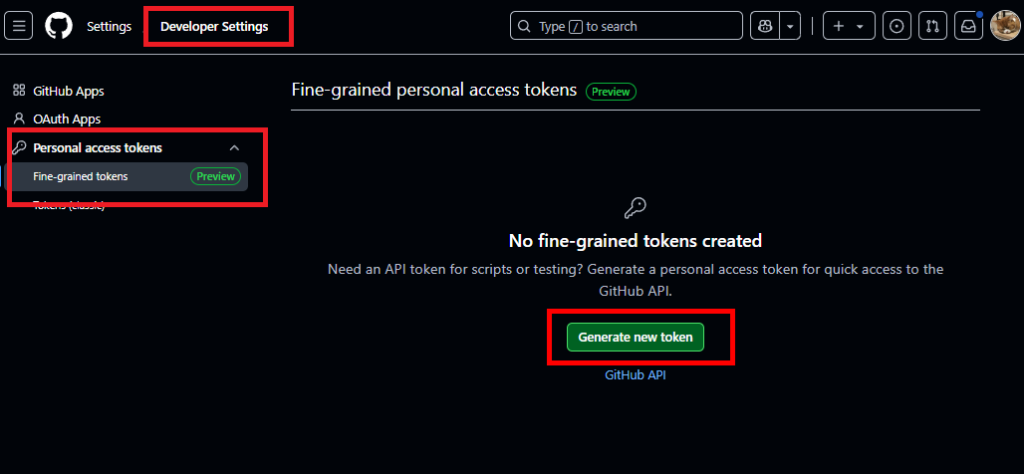

Set an appropriate name and token expiration date 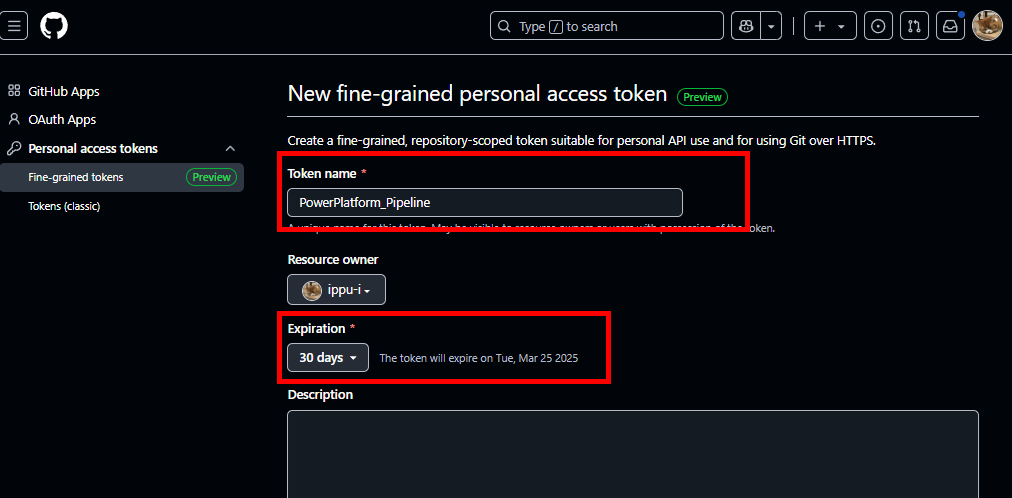

Limit the Repository access to the repository you just created 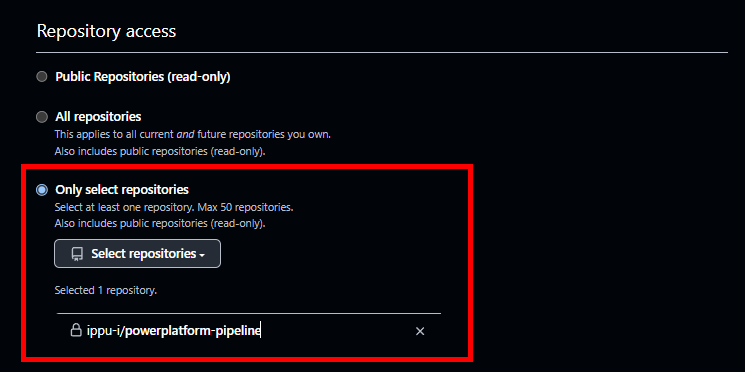

Under Permissions, set both [Actions] and [Contents] to “Read and Write” 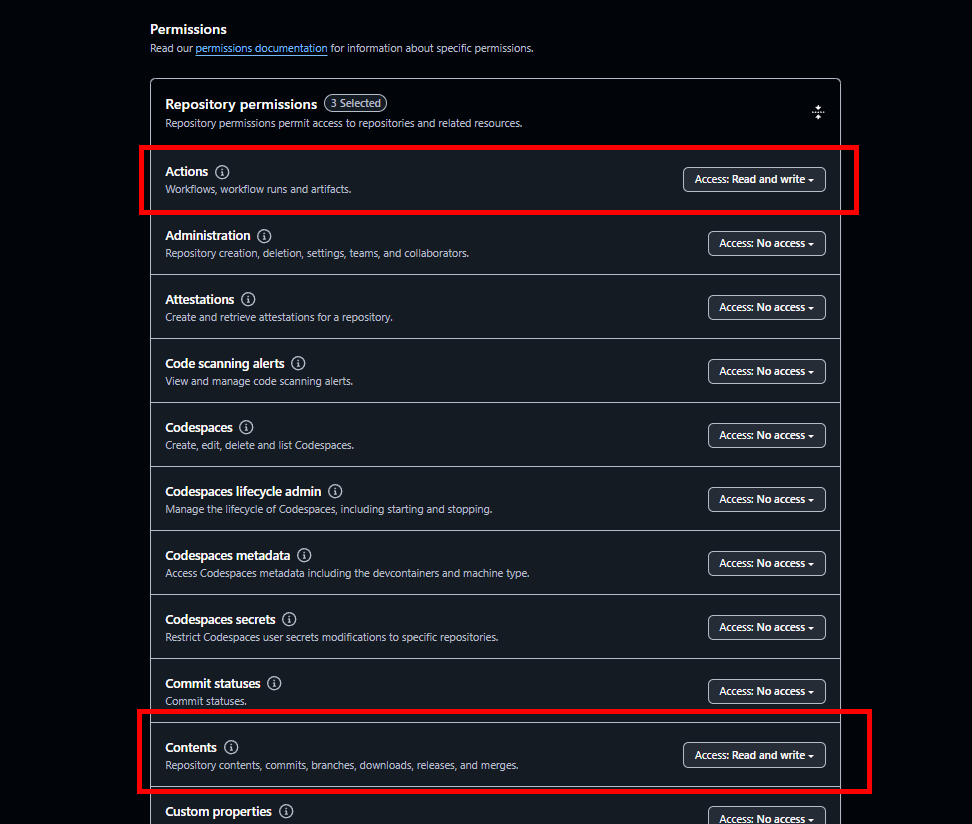

Click [Generate] and make note of the GitHub access token that is generated 
This completes the access token creation process.

Power Automate Setup: GitHub API Call
Finally, let’s build the Power Automate flow that calls the GitHub Actions we created. Here’s the overall flow diagram: 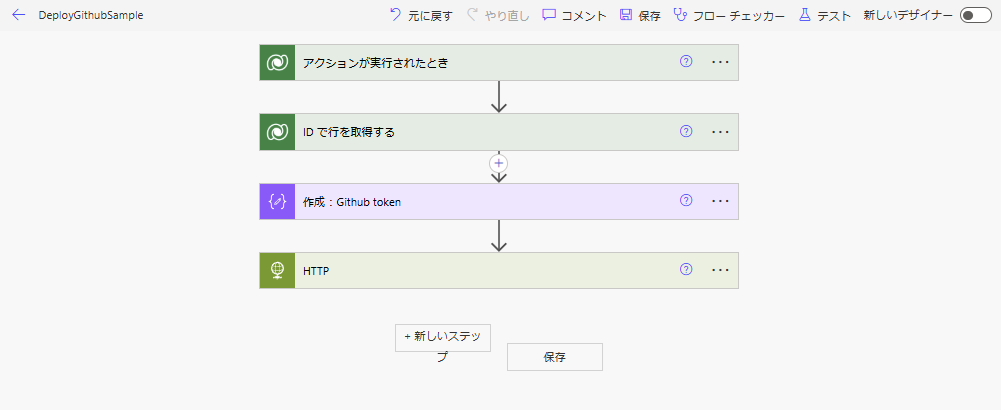

First, configure the trigger as shown below:
Note: While the official reference mentions “OnDeploymentRequested”, this might cause issues in some cases. For now, we’ll use this configuration.

Note: While the official reference mentions “OnDeploymentRequested”, this might cause issues in some cases. For now, we’ll use this configuration.

Next, use the “Get row by ID” action to retrieve a row from the “Deployment Stage Execution” table. 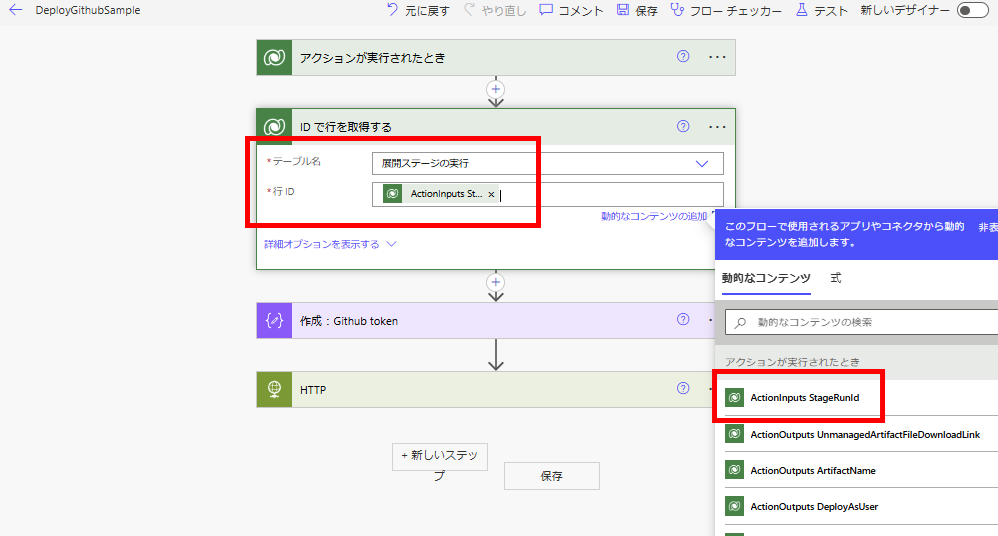

Finally, use the HTTP action to POST to the following URL:
URL: ~~~/repos/[Tenant(Username)]/[RepositoryName]/actions/workflows/[WorkflowFileName]/dispatches
Header: Authorization : Bearer [GitHub Access Token]
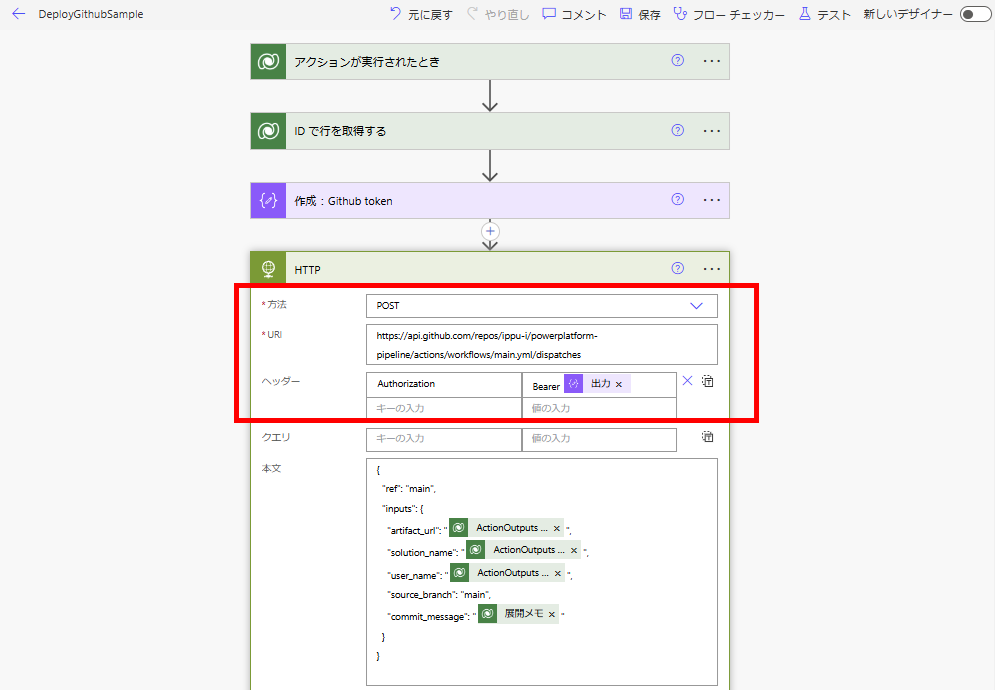
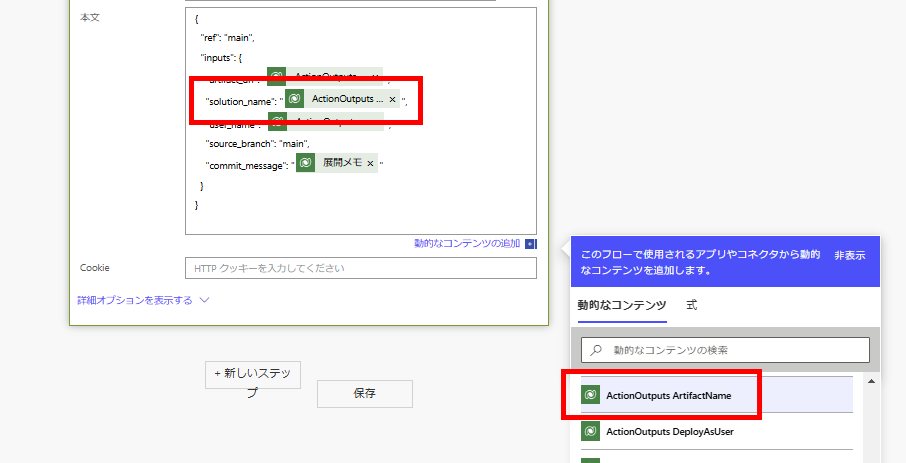
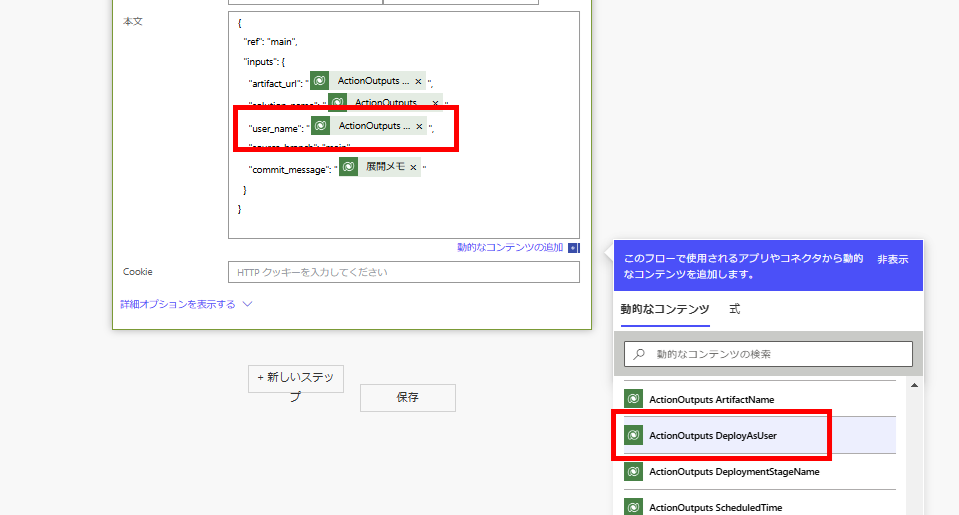
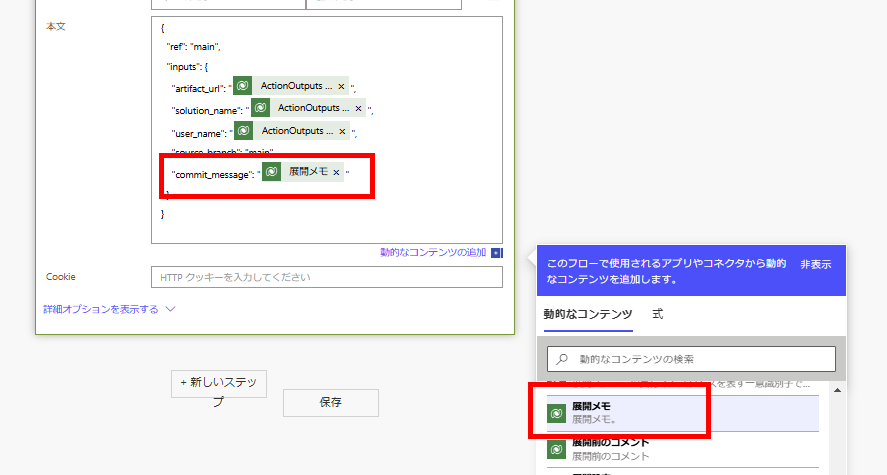
Configure the Body as shown below.
Note: Adjust the source_branch and target_branch settings according to your needs.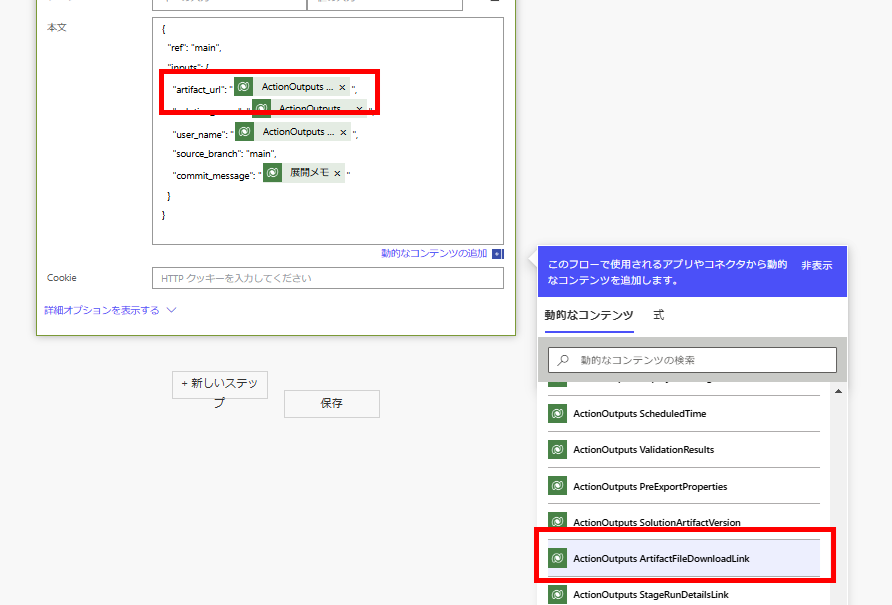
Although it was a bit lengthy, this completes the entire setup process.
URL: ~~~/repos/[Tenant(Username)]/[RepositoryName]/actions/workflows/[WorkflowFileName]/dispatches
Header: Authorization : Bearer [GitHub Access Token]

Configure the Body as shown below.
Note: Adjust the source_branch and target_branch settings according to your needs.
{
  "ref": "main",
  "inputs": {
    "artifact_url": "@{triggerOutputs()?['body/OutputParameters/ArtifactFileDownloadLink']}",
    "solution_name": "@{triggerOutputs()?['body/OutputParameters/ArtifactName']}",
    "user_name": "@{triggerOutputs()?['body/OutputParameters/DeployAsUser']}",
    "source_branch": "main",
    "commit_message": "@{outputs('Get row by ID')?['body/deploymentnotes']}"
  }
}


Operation Verification
Change the label content of the canvas app in the solution created in the previous article to v1.0.0.4, then save and publish. 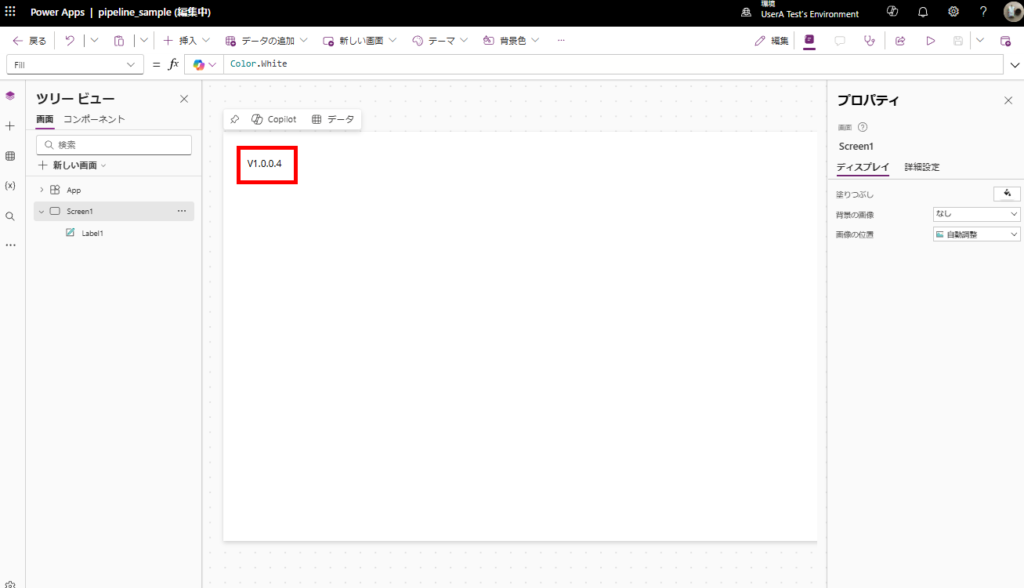

After publishing, when you trigger the configured pipeline, 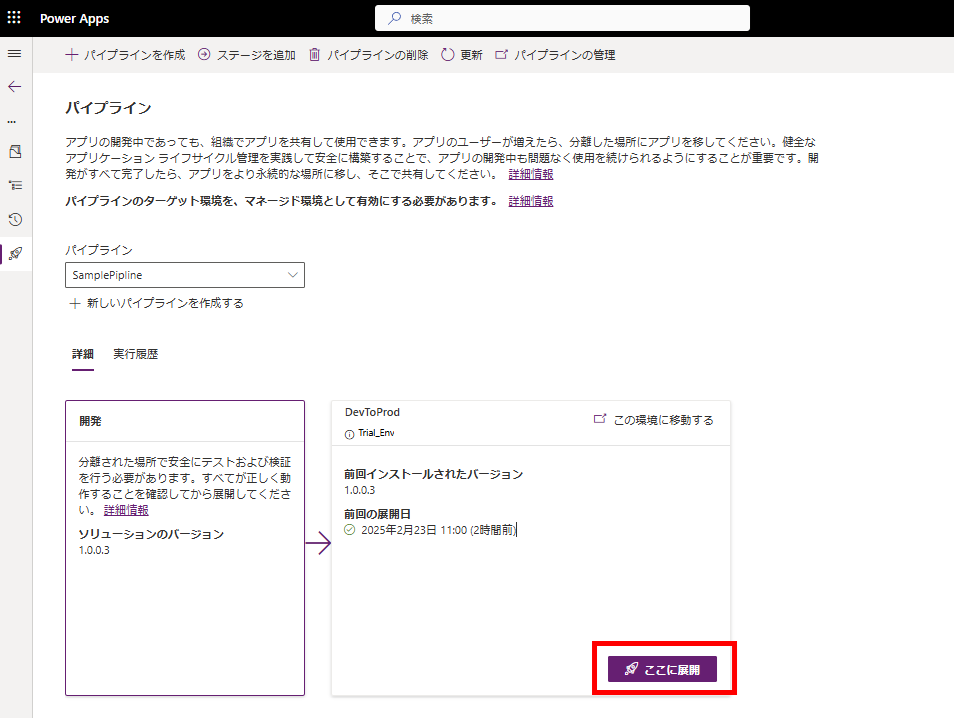
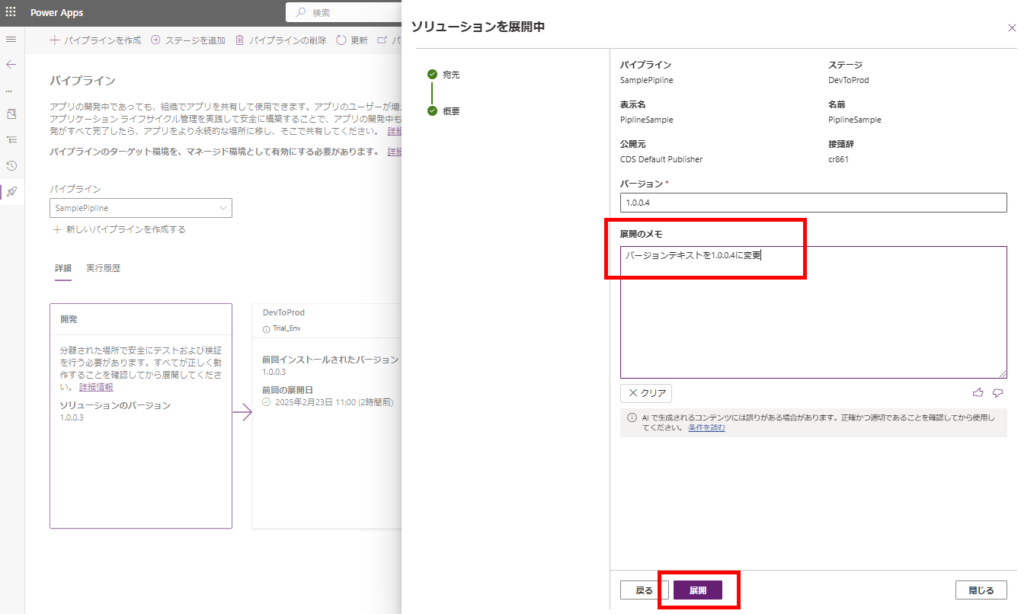


Power Automate executes and calls the GitHub Actions. 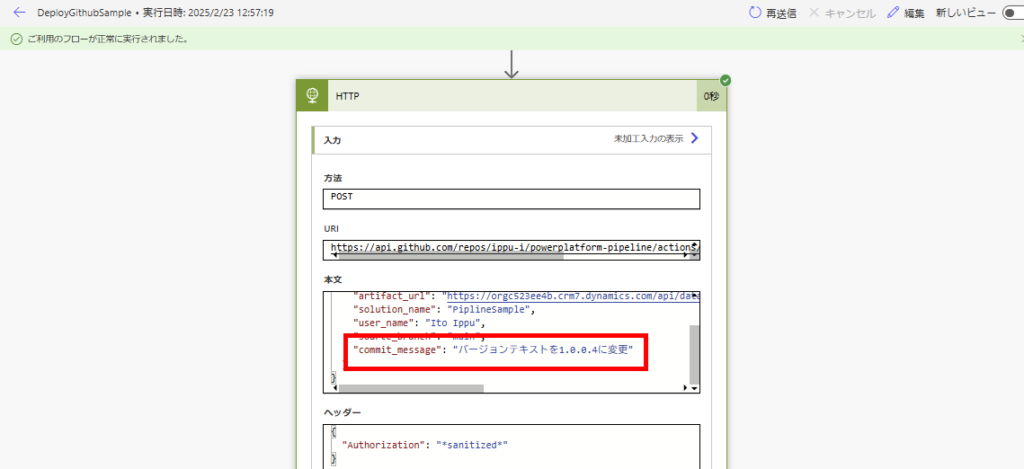

After a short wait, the GitHub action completes successfully, 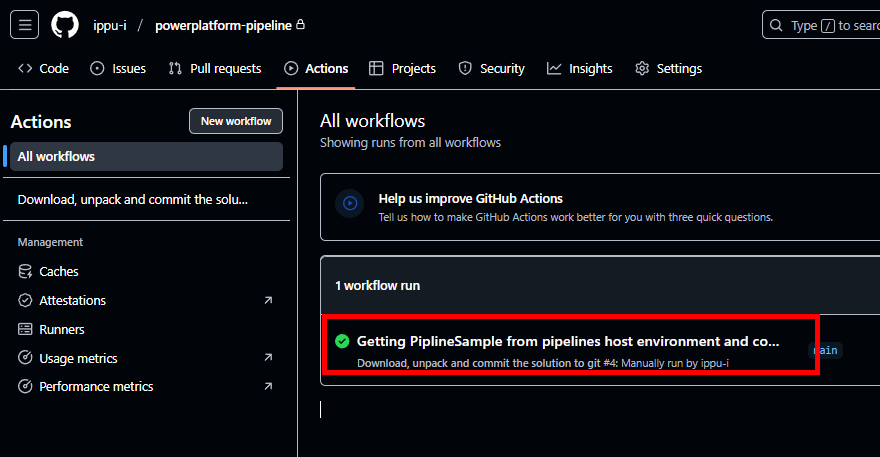

And the solution contents are committed to GitHub. 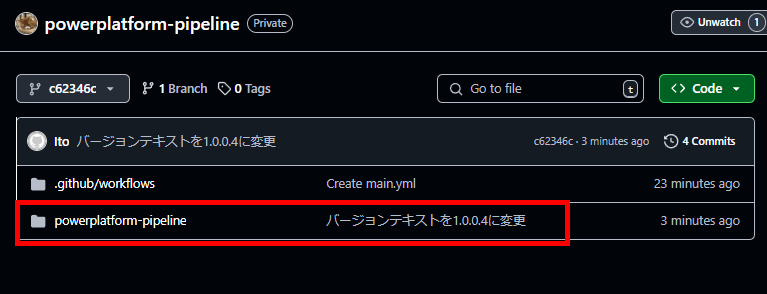

Since we modified the canvas app content, we can confirm that the .msapp file has been successfully updated. 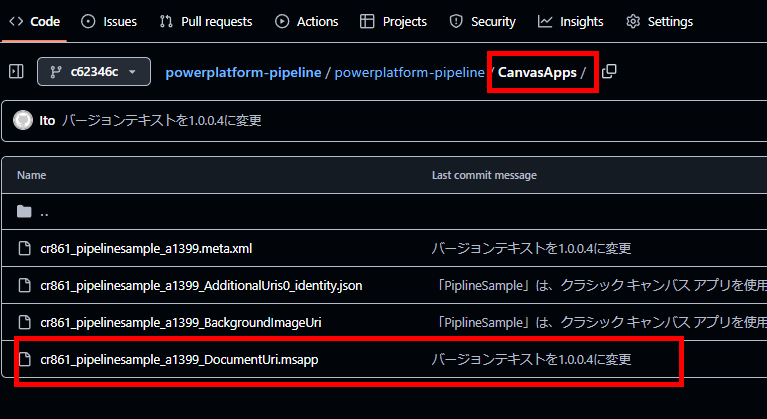

Actions May Sometimes Fail
When running the pipeline using exactly the same steps, 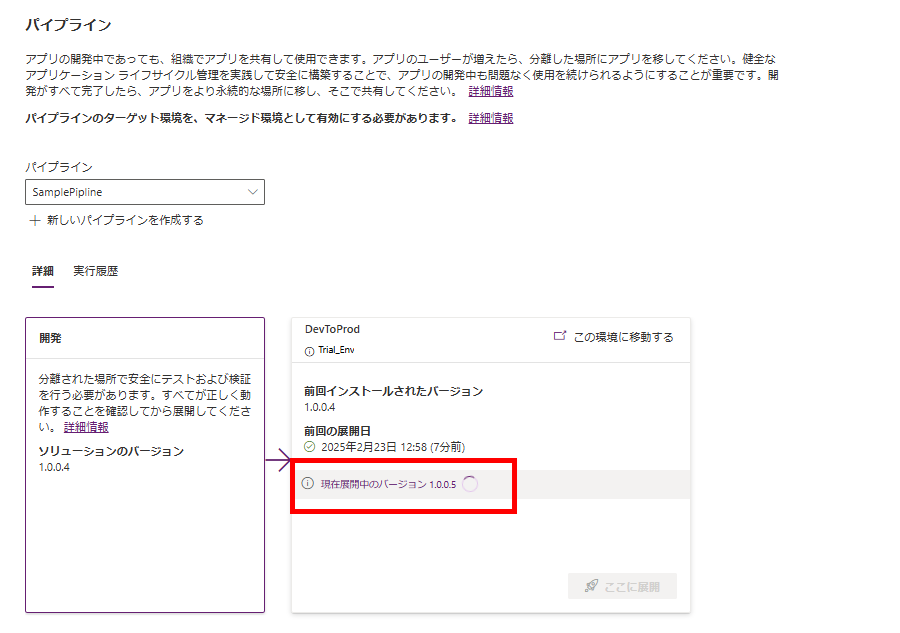

While Power Automate executes successfully, 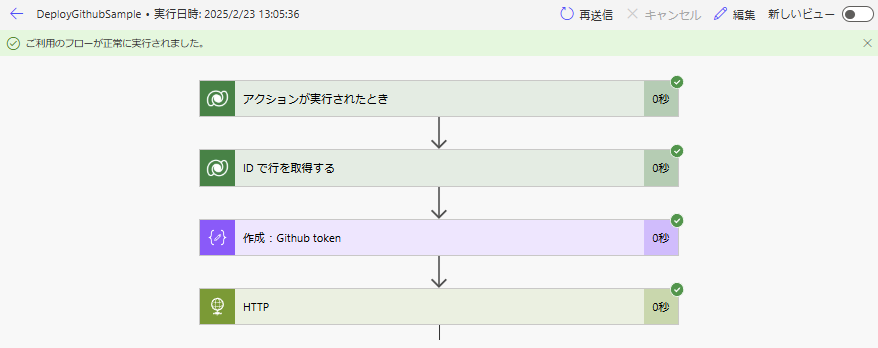

GitHub Actions may sometimes fail. 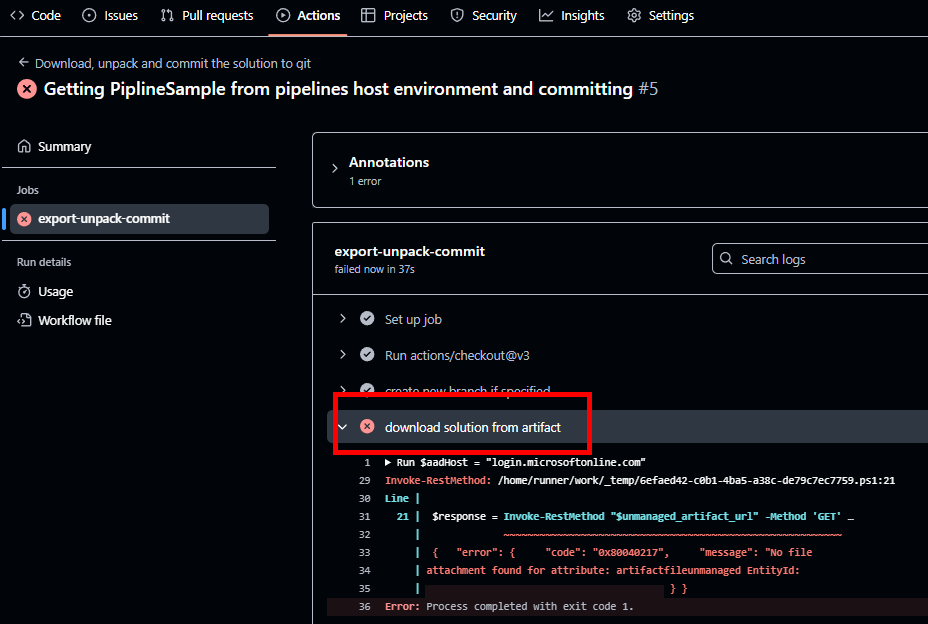
As indicated by the error message “No file attachment found for attribute”, this likely occurs when the GitHub action attempts to retrieve the managed solution zip file before the pipeline has completed the solution packaging process.

コメント