前回はこちら。
Power Platform ALM パイプラインを使用したソリューションのデプロイを解説|基本的なパイプライン構築
Power Platformの新しい管理ツール『パイプライン』を使う機会があったので、使い方をメモ。今回やること今回は開発環境で構築したソリューションを運用環境(別の環境)へ、『パイプライン』を使用してデプロイしてみる。まずは以下の環境を用...
ippu-biz.com
2025.02.14
GitHubへのコミット
前回作成したPower Platformのデプロイ用のパイプラインを拡張し、GitHubにソリューションをコミットしてみる。 基本的には以下の公式の手順と一緒だけど、一部変更が必要。公式

GitHub Actions を使用してパイプラインを拡張する - Power Platform
Power Automate フローを使用して、Power Apps を使用する GitHub ワークフローでソリューションをダウンロード、アンパック、コミットします。
learn.microsoft.com
構築
手順は以下の通り
- EntraIDへのアプリ登録
- Power Platform環境にアプリケーションユーザーの登録
- GitHub:リポジトリ作成→Actionsの作成
- GitHub:アクセストークン作成
- Power Automate構築:GitHubのAPIコール
EntraIDへの登録
まずはEntra IDの登録から。この手順では以下3つの値をメモする。
- クライアントシークレット
- クライアントID(アプリID)
- テナントID
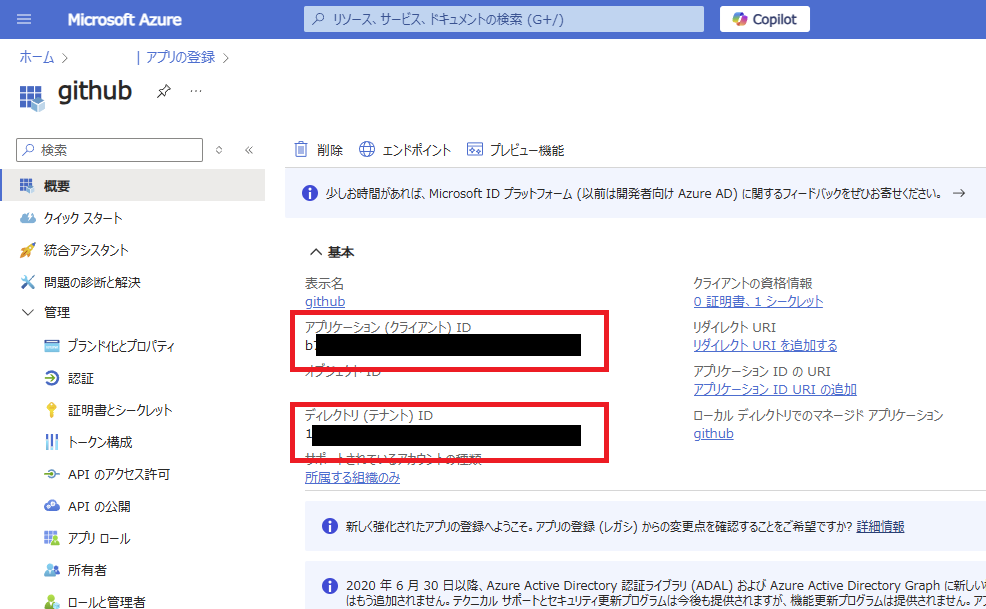
まずはAzure PortalでEntra IDを開き、
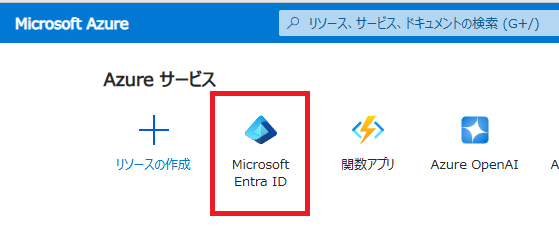
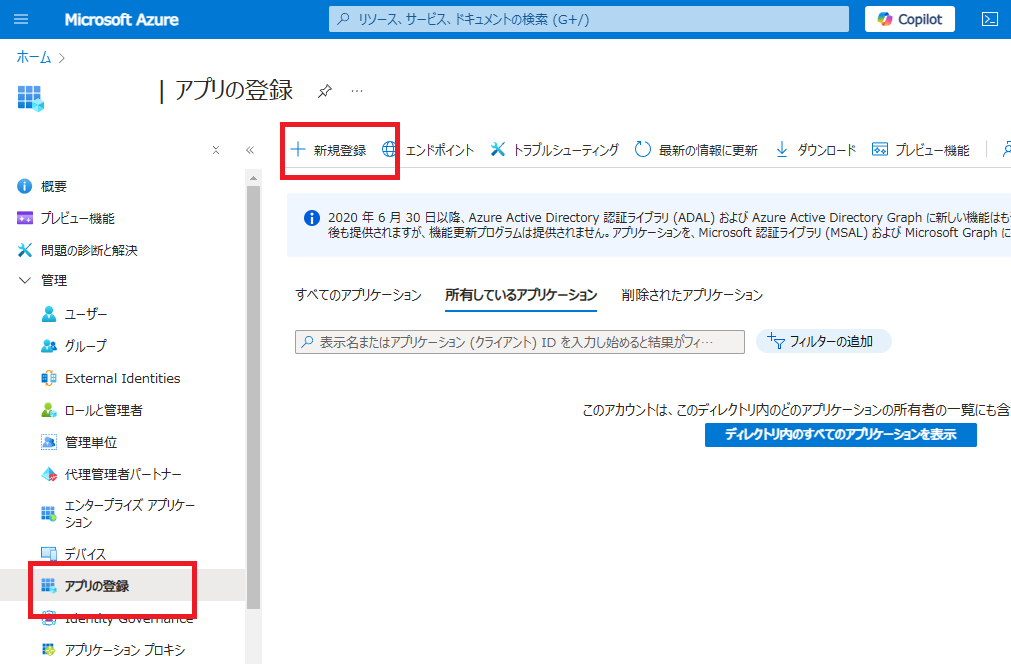
[アプリの登録]から[新規登録]を選ぶ。
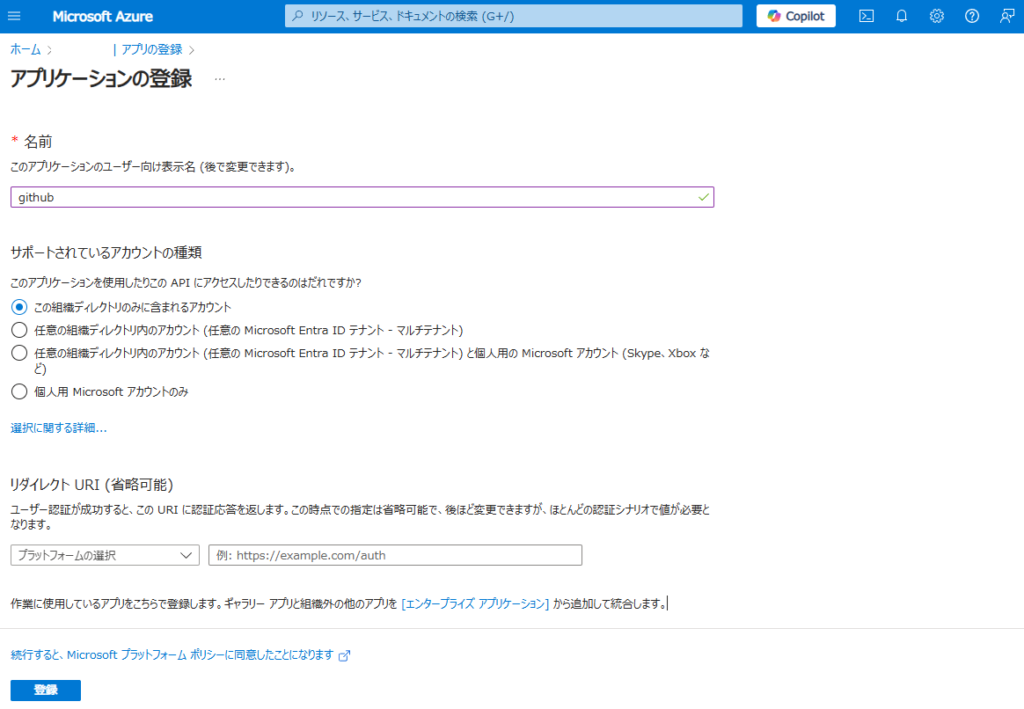
適当な名前を付けて、シングルテナントで登録。
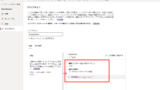
続いて登録したアプリの[APIのアクセス許可]から、[Dynamics CRM]を選んで、
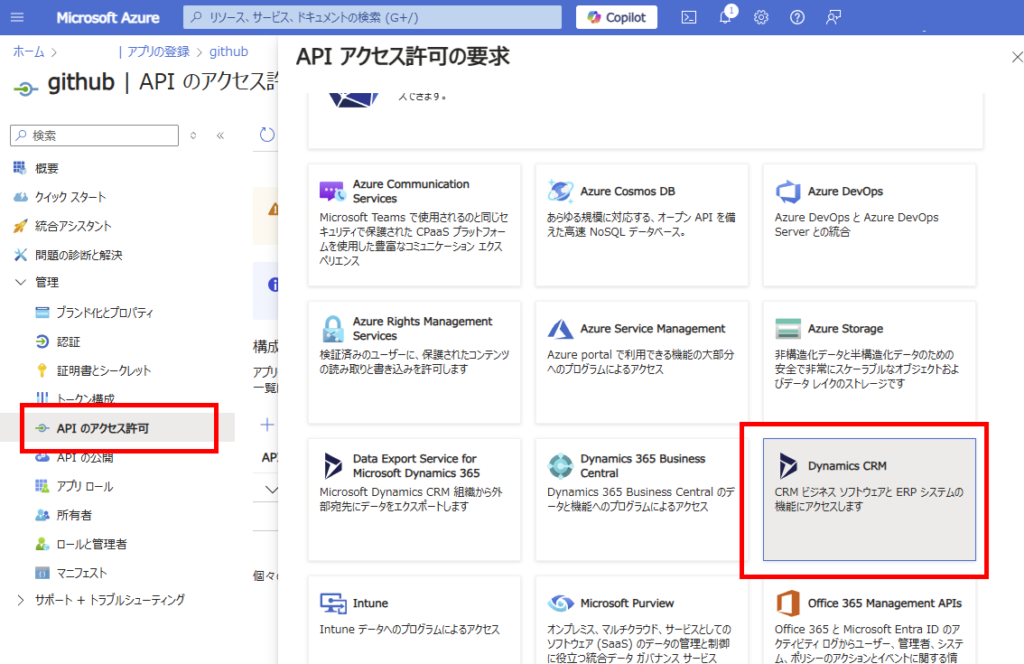
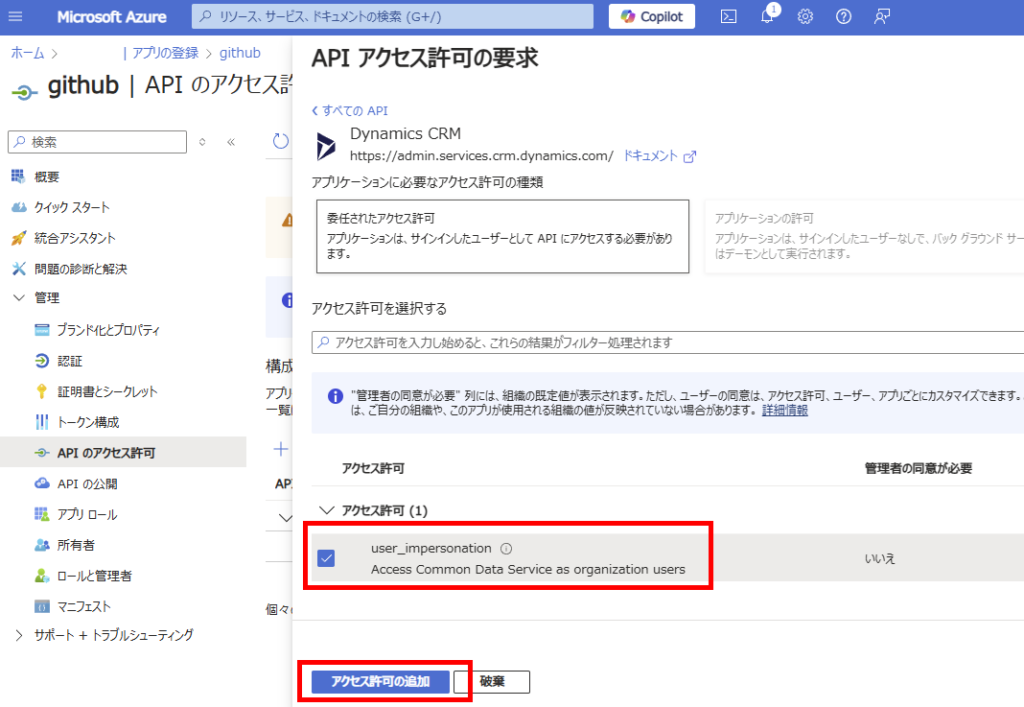
「user_impersonation」をチェックし、[アクセス許可の追加]。
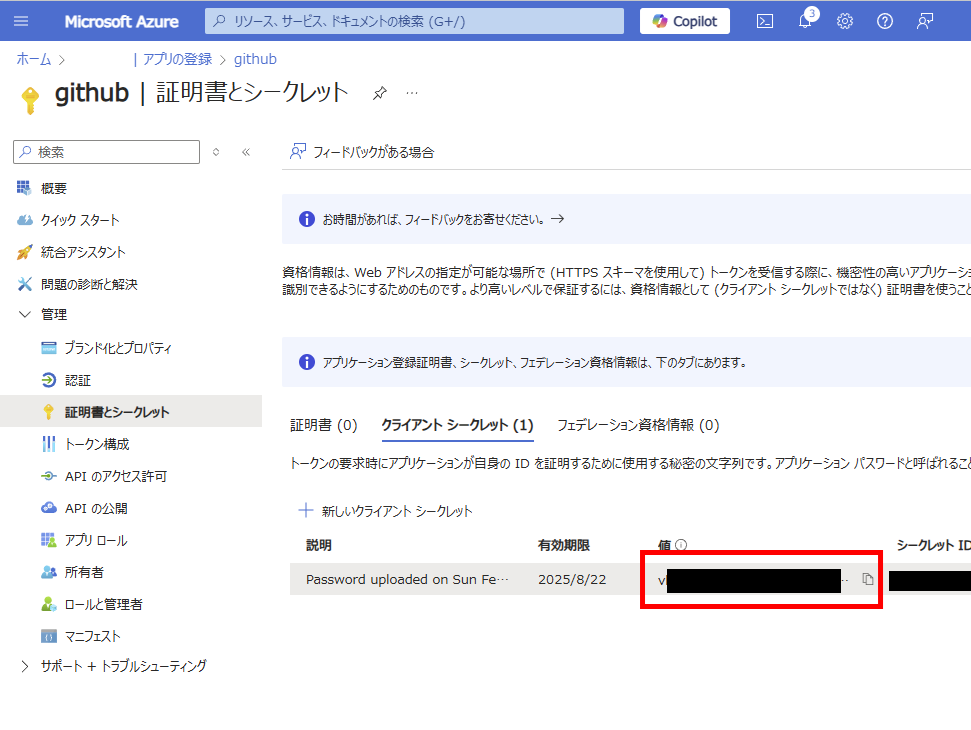
[証明書とシークレット]から[新しいクライアントシークレット]を選び、
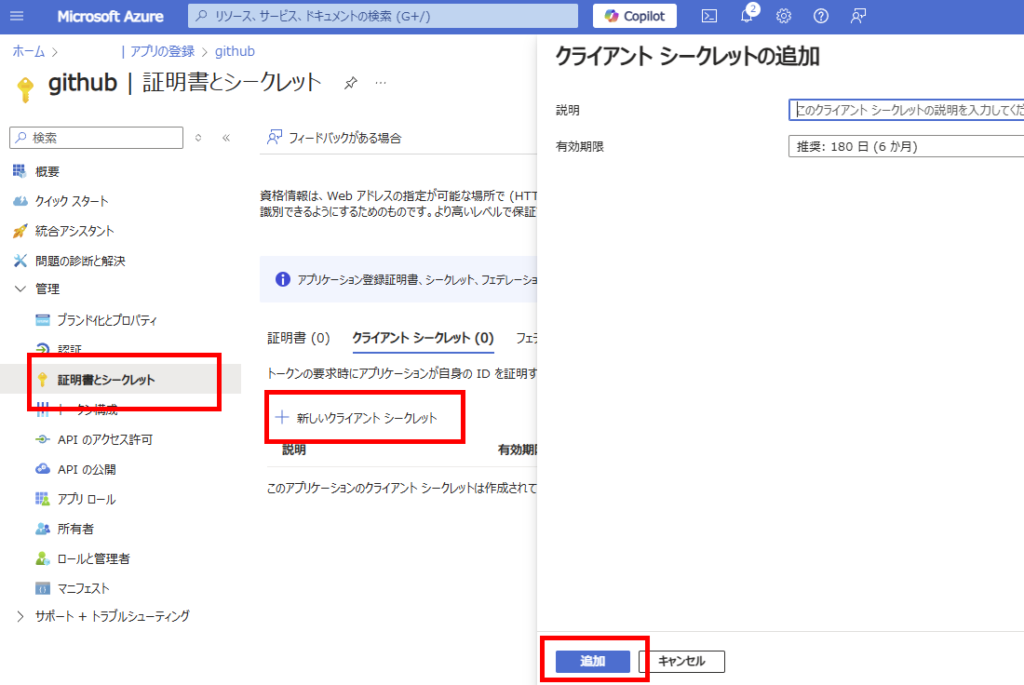
生成された値をメモ。
最後に[概要]から[アプリID]と[テナントID]をメモすれば、この手順は終了。
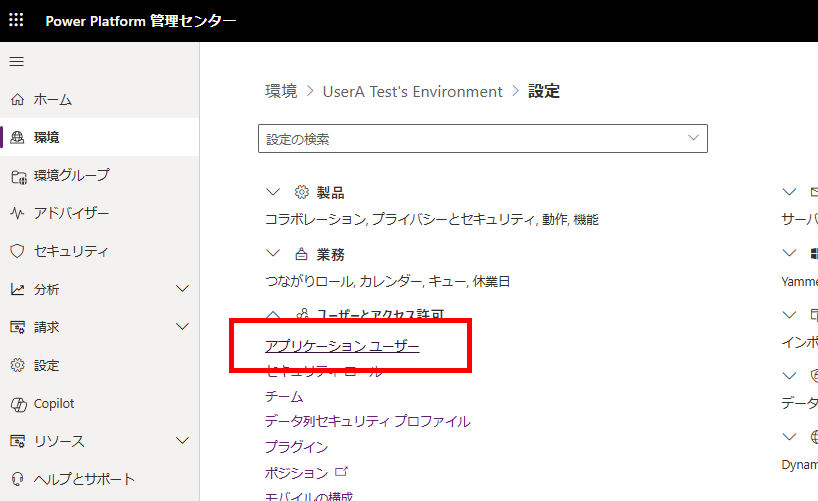
Power Platform環境にアプリケーションユーザーの登録
続いて、Power Platformの環境にアプリケーションユーザーを作成し、GitHubへDataverseへのセキュリティロールを与える。Power Platform管理センターから、パイプラインを構築した環境を選び、[設定]を押す。

[アプリケーションユーザー]を選び、
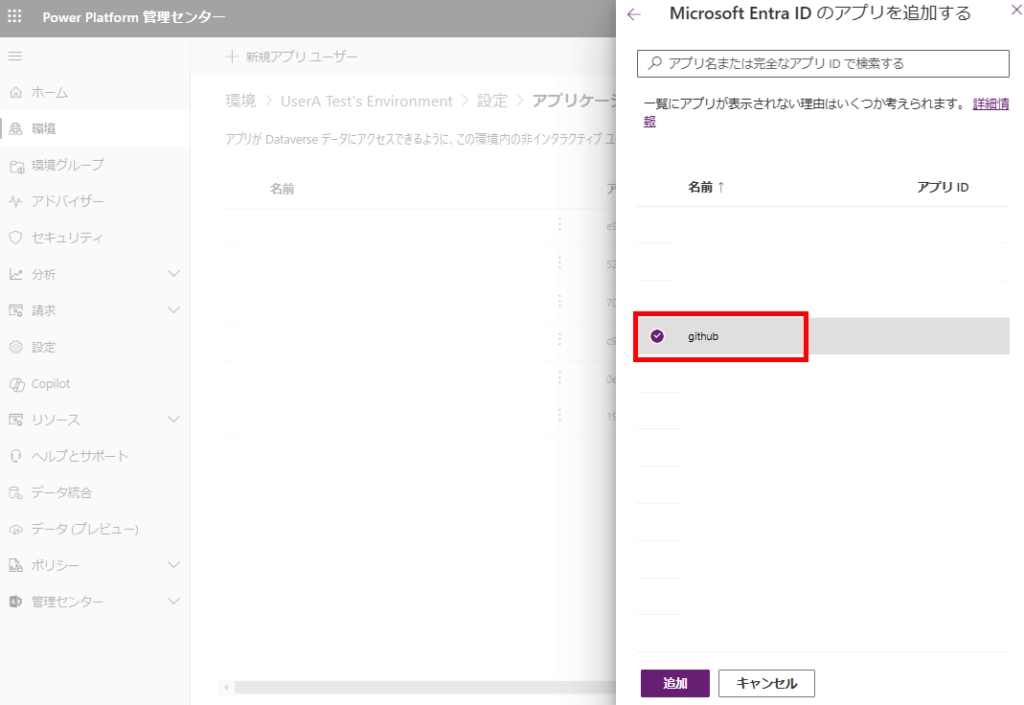
[新規アプリユーザー]から、[アプリの追加]、
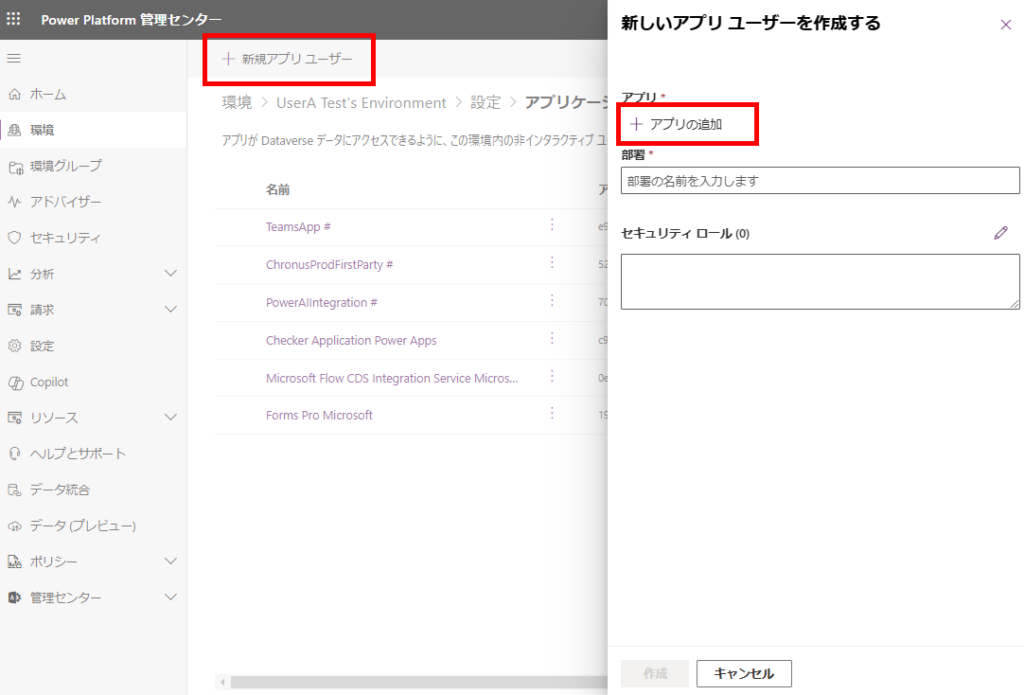
前の手順でEntra IDに追加したアプリを選択する。
部署(今回はサンプルなのでルート部署)と、セキュリティロールを設定し、[作成]。
※セキュリティロールはSystem Customizerで確実に動作するけど、権限を最低限にしたい場合はカスタムロールの作成を推奨。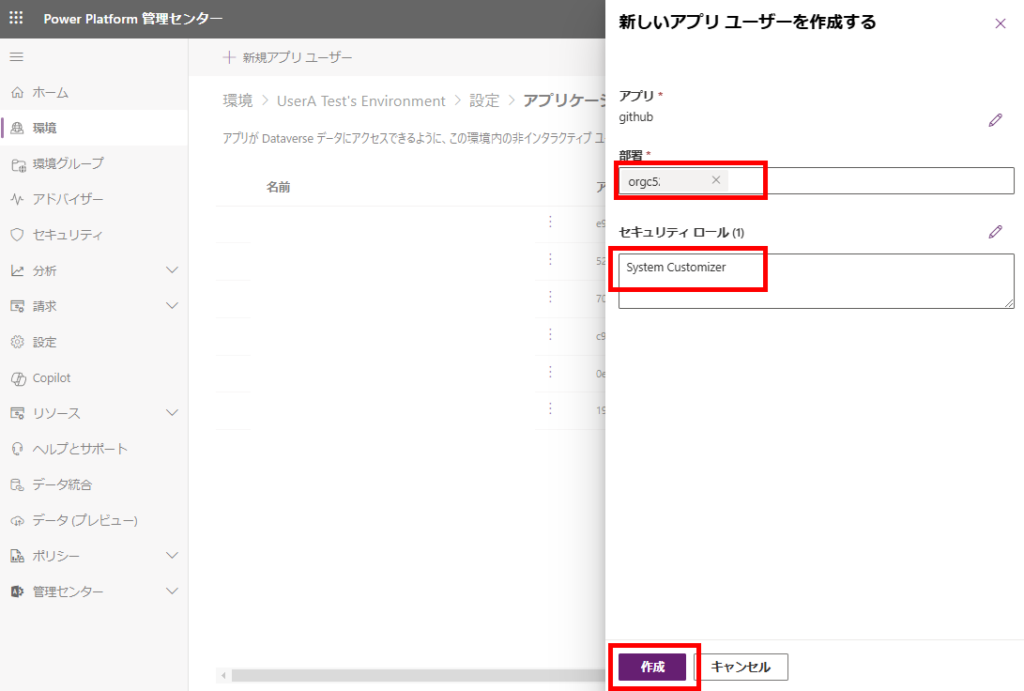
以上でPower Platformへのアプリケーションユーザーの登録は完了。
※セキュリティロールはSystem Customizerで確実に動作するけど、権限を最低限にしたい場合はカスタムロールの作成を推奨。
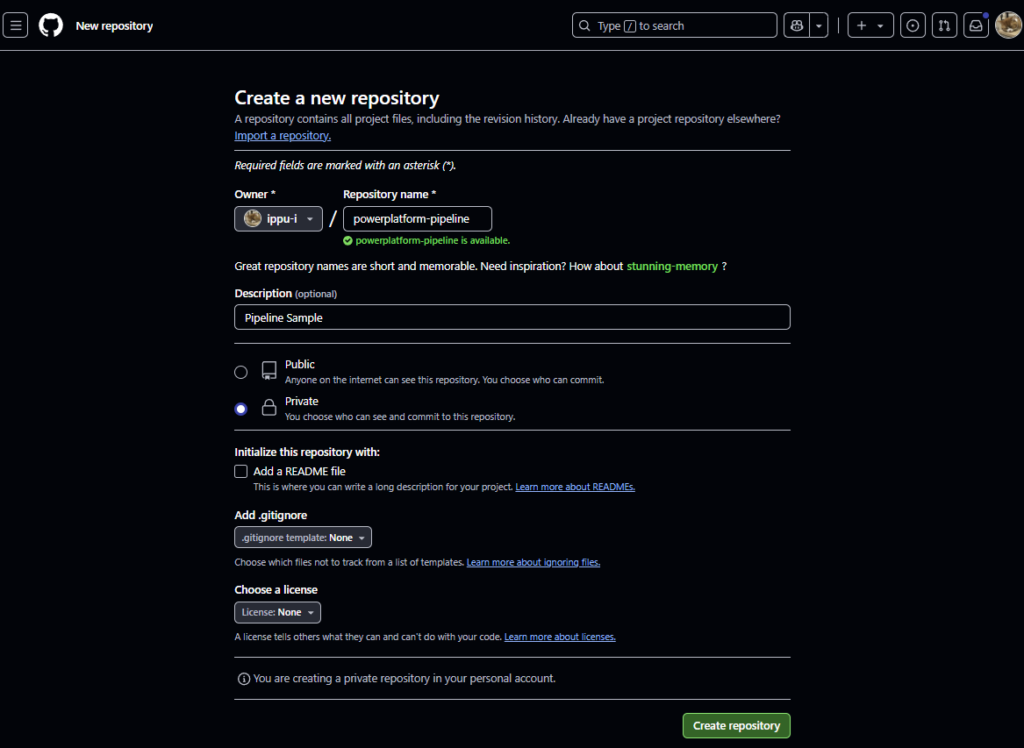
GitHub:リポジトリ作成→Actionsの作成
リポジトリ作成
GitHubへ移動し、リポジトリを作成。
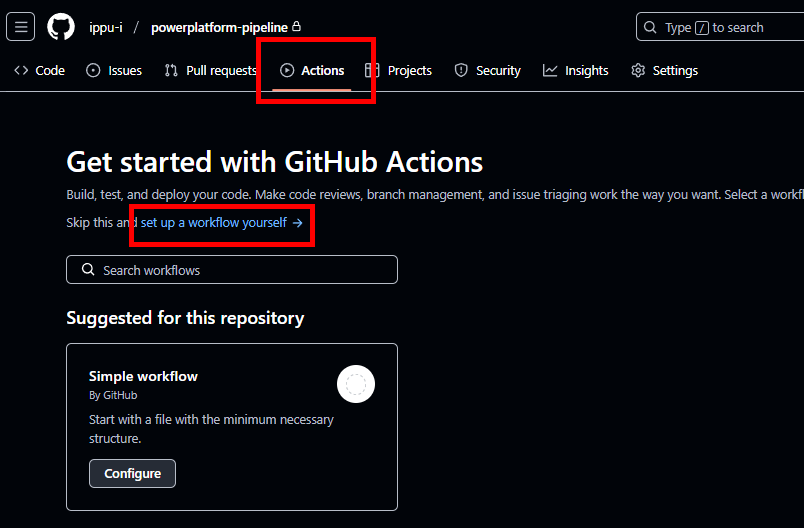
Actions設定
リポジトリを作成したら、Actionsから[set up a workflow yourself]を選択。
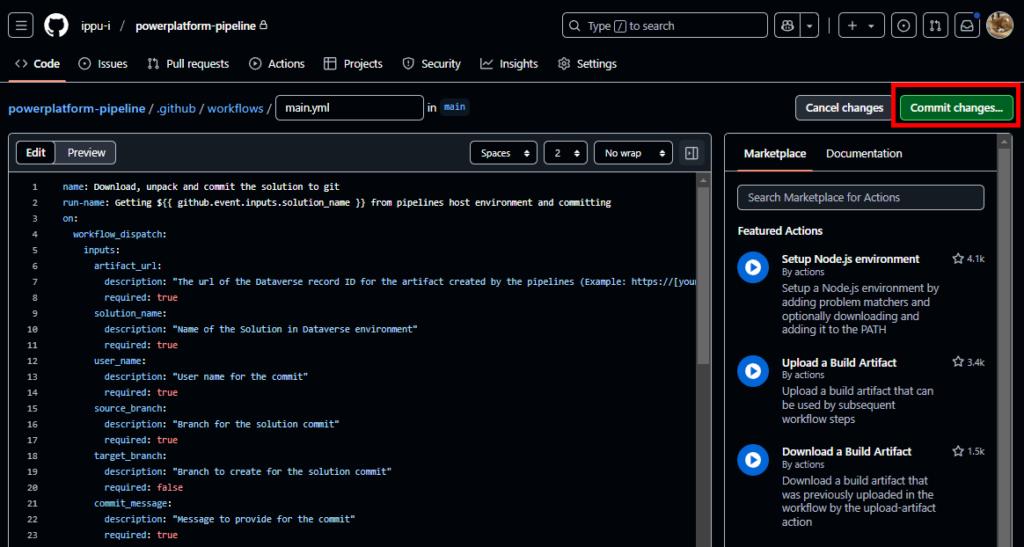
そしたら、公式のコードの一部を修正した以下のコードを貼り付け、[Commit changes]を押す。
コードの修正は以下の通り。
# 変更前
      # Unpack the solution
      - name: unpack solution
        uses: microsoft/powerplatform-actions/unpack-solution@v0
        with:
          solution-file: "${{ github.event.inputs.solution_name }}.zip"
          solution-folder: "${{ github.event.repository.name }}"
          solution-type: 'Both'
          process-canvas-apps: false
          overwrite-files: true

# 変更後(unpack-solutionがv0だと動かなかったので、v1を使用)
      # Install PAC
      - name: Install Power Platform Tools
        uses: microsoft/powerplatform-actions/actions-install@v1

      # Unpack the solution
      - name: unpack solution
        uses: microsoft/powerplatform-actions/unpack-solution@v1
        with:
          solution-file: "${{ github.event.inputs.solution_name }}.zip"
          solution-folder: "${{ github.event.repository.name }}"
          solution-type: 'Both'
          process-canvas-apps: false
          overwrite-files: true
以下全文。
name: Download, unpack and commit the solution to git
run-name: Getting ${{ github.event.inputs.solution_name }} from pipelines host environment and committing
on:
  workflow_dispatch:
    inputs:
      artifact_url:
        description: "The url of the Dataverse record ID for the artifact created by the pipelines (Example: https://[your-env].crm.dynamics.com/api/data/v9.0/deploymentartifacts([your-artifact-id])/artifactfile/$value)."
        required: true
      solution_name:
        description: "Name of the Solution in Dataverse environment"
        required: true
      user_name:
        description: "User name for the commit"
        required: true
      source_branch:
        description: "Branch for the solution commit"
        required: true
      target_branch:
        description: "Branch to create for the solution commit"
        required: false
      commit_message:
        description: "Message to provide for the commit"
        required: true
permissions:
  contents: write
jobs:
  export-unpack-commit:
    runs-on: ubuntu-latest

    steps:
      - uses: actions/checkout@v3
        with:
            ref: ${{ github.event.inputs.source_branch }}

      # Commit changes to the existing or new branch
      - name: create new branch if specified
        shell: pwsh
        run: |
            if('${{ github.event.inputs.target_branch }}' -ne '') {
                git checkout -b ${{ github.event.inputs.target_branch }} ${{ github.event.inputs.source_branch }}
            }

      # Export the solution from the artifact created by pipelines
      - name: download solution from artifact
        env:
            CLIENT_ID: ${{secrets.CLIENT_ID}}
            TENANT_ID: ${{secrets.TENANT_ID}}
            CLIENT_SECRET: ${{secrets.CLIENT_SECRET}}
        shell: pwsh
        run: |
            $aadHost = "login.microsoftonline.com"
            $url = "${{ github.event.inputs.artifact_url }}"
            $options = [System.StringSplitOptions]::RemoveEmptyEntries
            $dataverseHost = $url.Split("://", $options)[1].Split("/")[0]

            $body = @{client_id = $env:CLIENT_ID; client_secret = $env:CLIENT_SECRET; grant_type = "client_credentials"; scope = "https://$dataverseHost/.default"; }
            $OAuthReq = Invoke-RestMethod -Method Post -Uri "https://$aadHost/$env:TENANT_ID/oauth2/v2.0/token" -Body $body
            $spnToken = $OAuthReq.access_token
            $headers = New-Object "System.Collections.Generic.Dictionary[[String],[String]]"
            $headers.Add("Authorization", "Bearer $spnToken")
            $headers.Add("Content-Type", "application/json")

            # Download the managed solution
            $response = Invoke-RestMethod "${{ github.event.inputs.artifact_url }}" -Method 'GET' -Headers $headers
            $bytes = [Convert]::FromBase64String($response.value)
            [IO.File]::WriteAllBytes("${{ github.event.inputs.solution_name }}_managed.zip", $bytes)

            # Download the unmanaged solution (for now we will need to use string manipulation to get the unmanaged solution URL, until the API provides this value)
            $unmanaged_artifact_url = "${{ github.event.inputs.artifact_url }}".Replace("artifactfile", "artifactfileunmanaged")
            $response = Invoke-RestMethod "$unmanaged_artifact_url" -Method 'GET' -Headers $headers
            $bytes = [Convert]::FromBase64String($response.value)
            [IO.File]::WriteAllBytes("${{ github.event.inputs.solution_name }}.zip", $bytes)

      # Install PAC
      - name: Install Power Platform Tools
        uses: microsoft/powerplatform-actions/actions-install@v1

      # Unpack the solution
      - name: unpack solution
        uses: microsoft/powerplatform-actions/unpack-solution@v1
        with:
          solution-file: "${{ github.event.inputs.solution_name }}.zip"
          solution-folder: "${{ github.event.repository.name }}"
          solution-type: 'Both'
          process-canvas-apps: false
          overwrite-files: true

      # Commit changes to the existing or new branch
      - name: commit changes
        shell: pwsh
        run: |
          rm -rf ${{ github.event.inputs.solution_name }}.zip
          rm -rf ${{ github.event.inputs.solution_name }}_managed.zip
          git config user.name ${{ github.event.inputs.user_name }}
          git pull
          git add --all
          git commit -am "${{ github.event.inputs.commit_message }}" --allow-empty

      # Push the committed changes to the source branch
      - name: push to branch
        shell: pwsh
        run: |
          if('${{ github.event.inputs.target_branch }}' -ne '') {
              git push origin ${{ github.event.inputs.target_branch }}
          } else {
              git push origin ${{ github.event.inputs.source_branch }}
          }
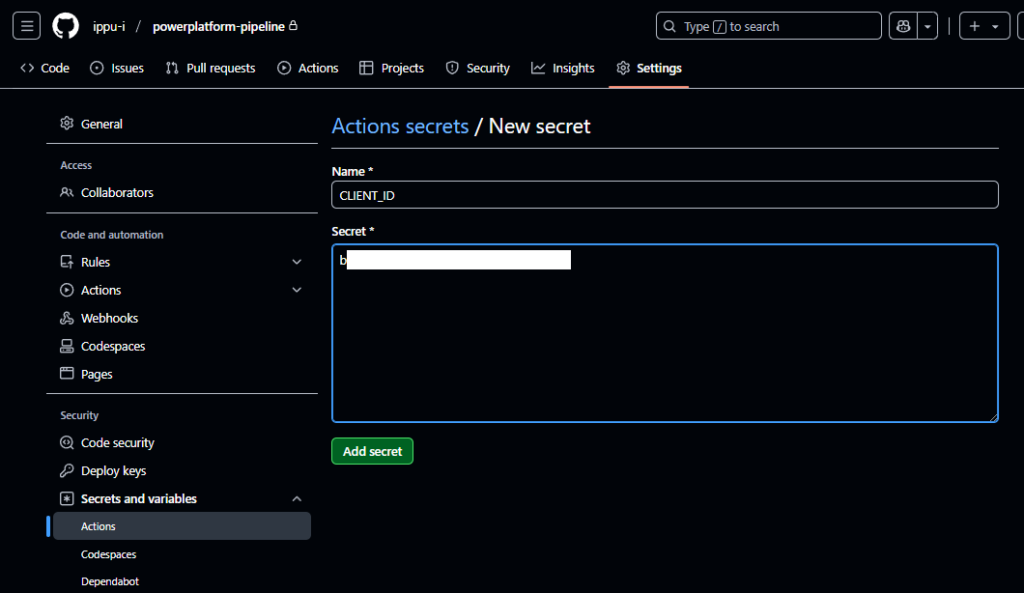
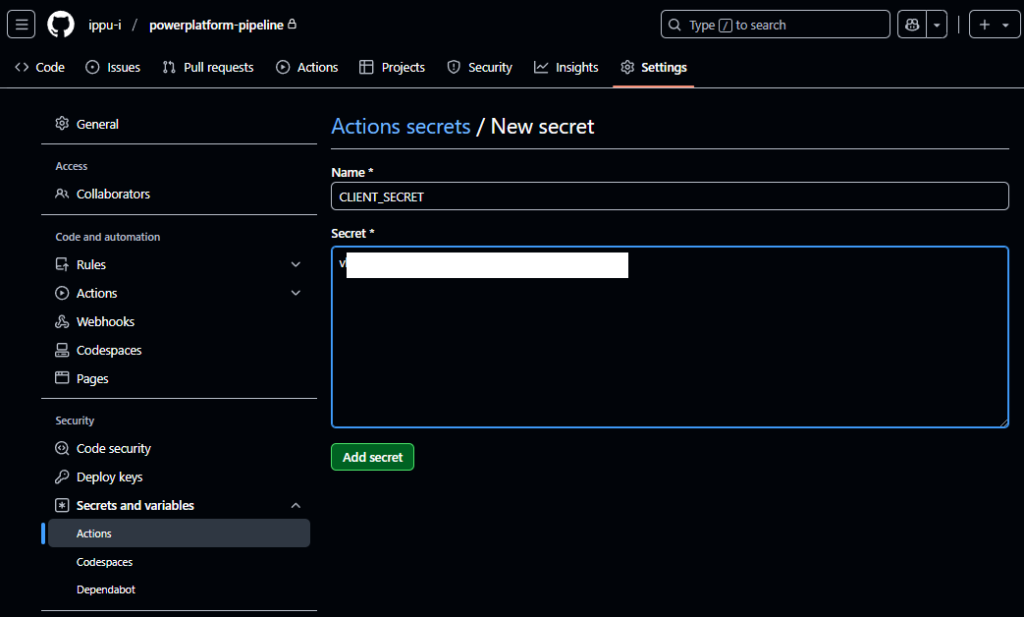
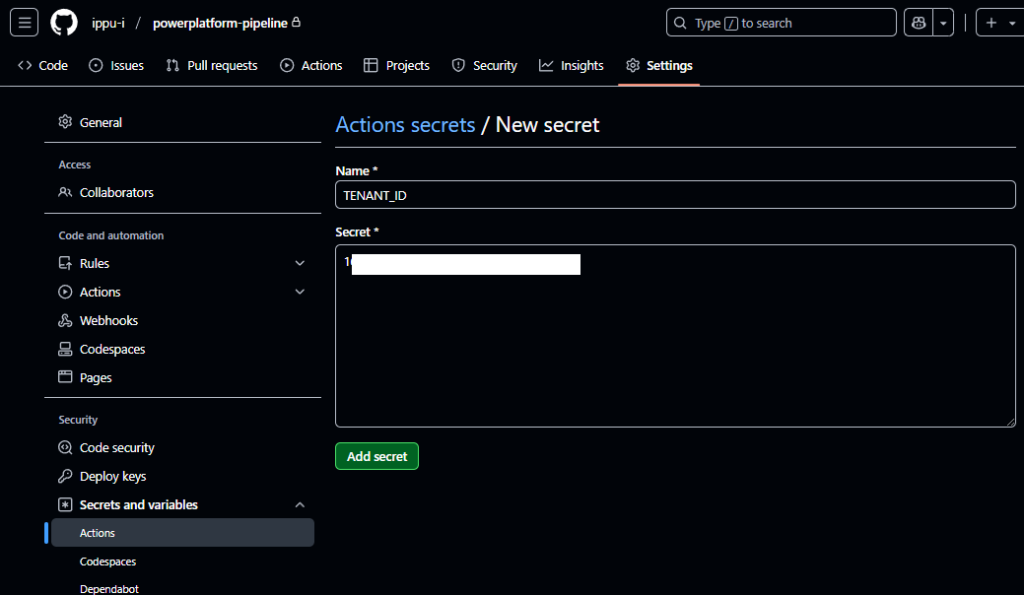
リポジトリにシークレットを登録
該当リポジトリの[Settings]を開いて、[Secrets and variables]の[Actions]を選択し、[New repository secret]を選択。
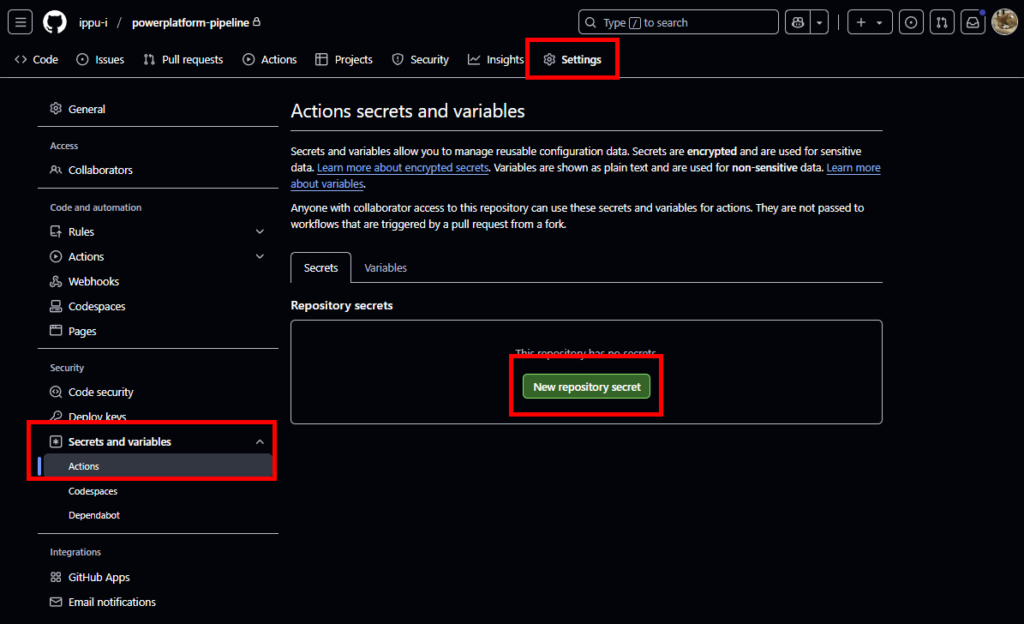
ここで、Entra ID設定時にメモした3つの値を設定する
以上で、リポジトリとActionsの設定は完了。
- CLIENT_ID : クライアントID
- CLIENT_SECRET:シークレット
- TENANT_ID:テナントID
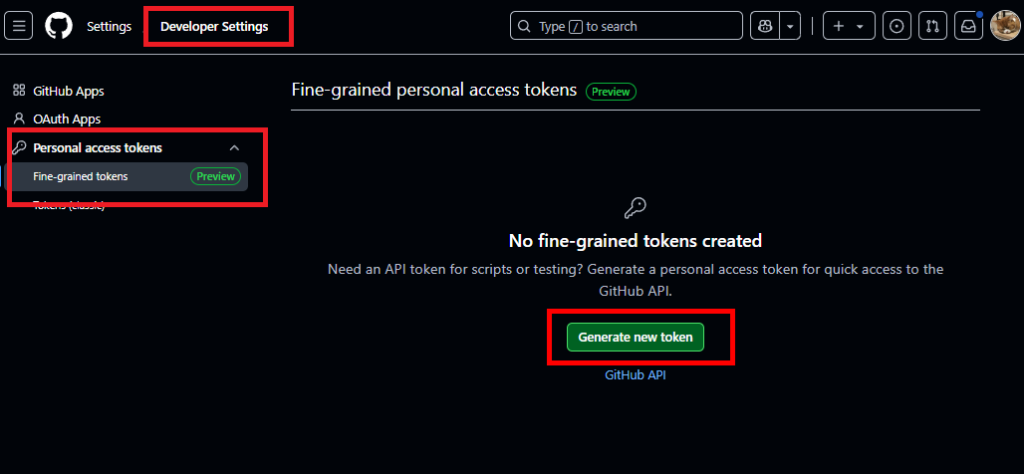
GitHub:アクセストークンの作成
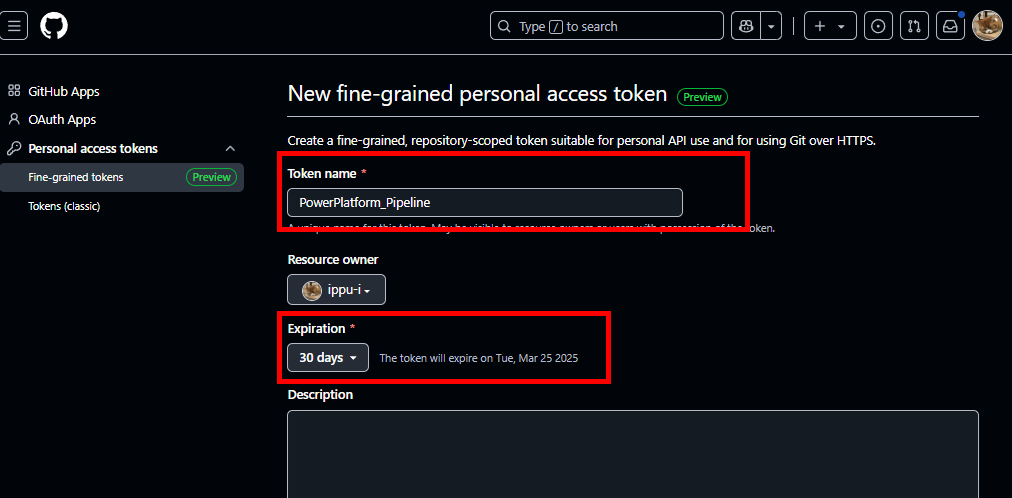
GitHubのテナント(ユーザー)の設定を開き、[Developer Settings]から[Personal access tokens]の[Fine-grained tokens]を選択。[Generate new token]を押す。
適当な名前と、トークンの有効期限を設定、
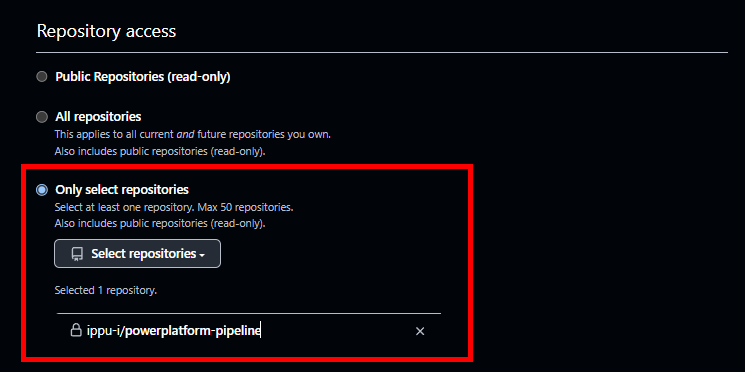
Repository accessを先ほど作成したリポジトリに限定し、
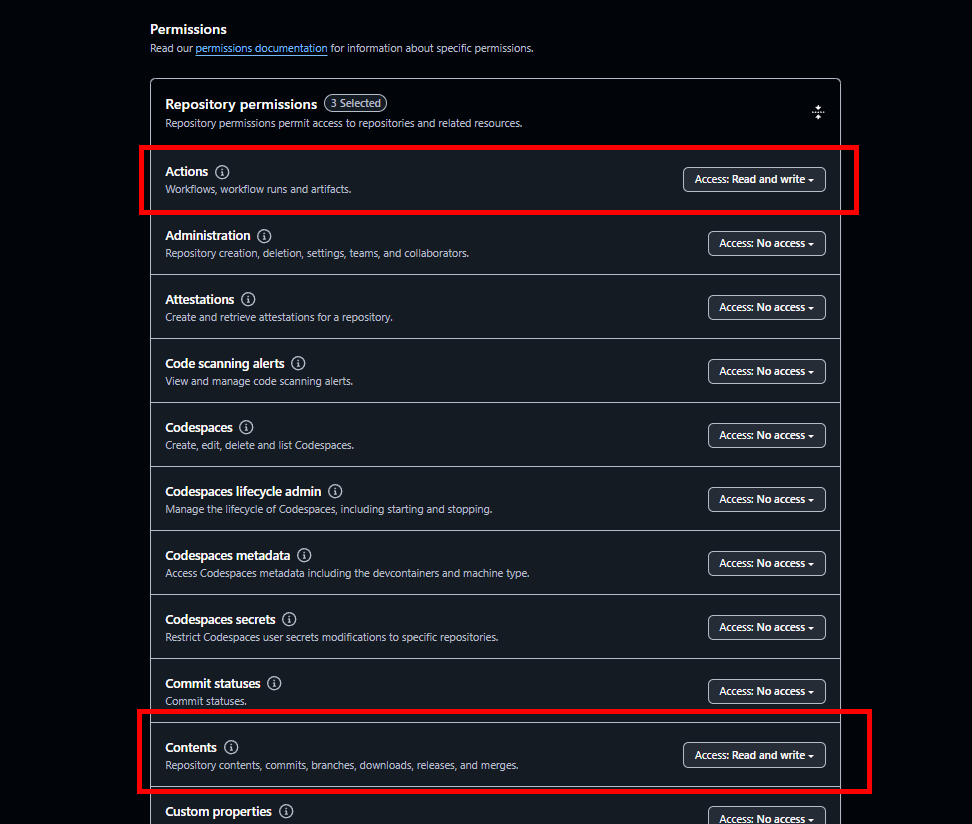
Permissionsで[Actions]と[Contents]を「Read and Write」にする。
[Generate]を押下し、出力されるGitHubのアクセストークンをメモする。
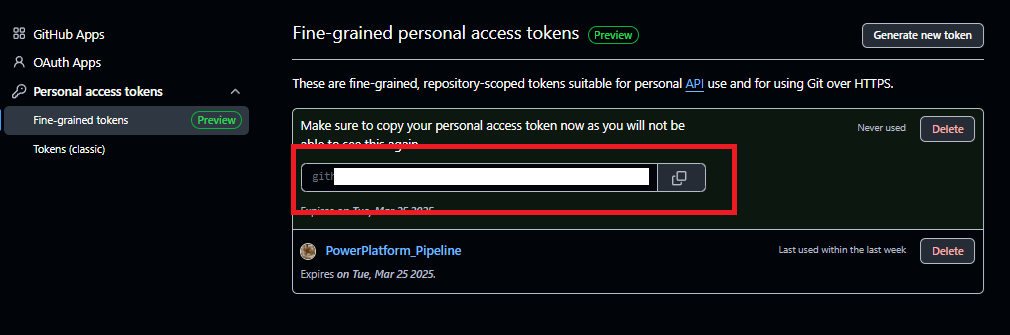
以上でアクセストークンの作成は完了。
Power Automate構築:GitHubのAPIコール
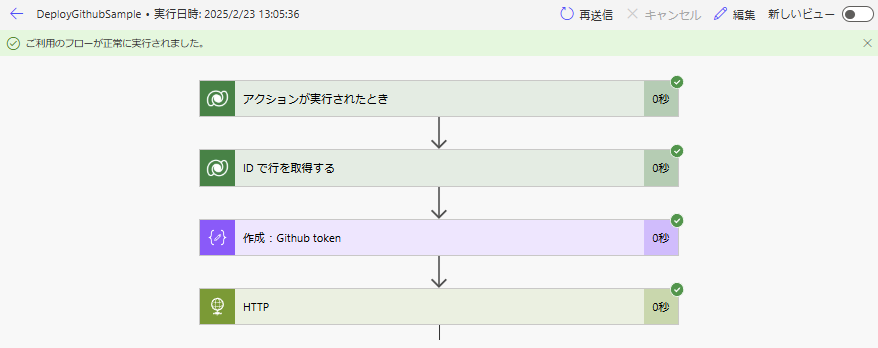
最後にGitHubで作成したActionsを呼び出すPower Automateの構築。全体図はこんな感じ。
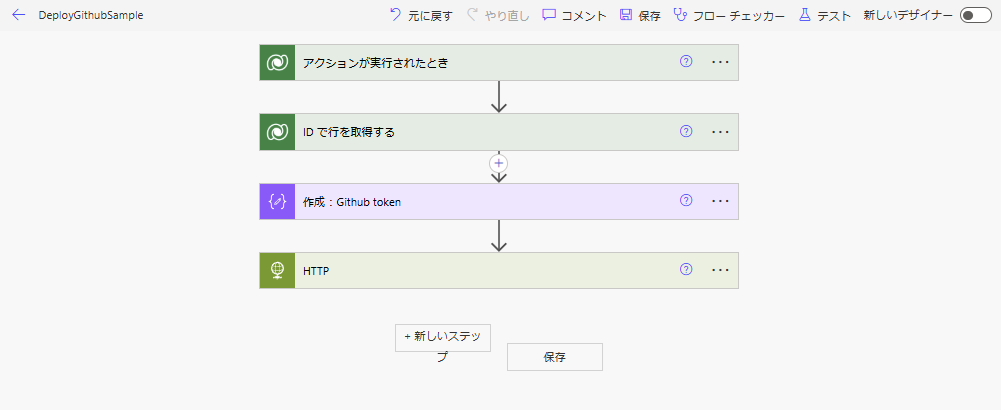
まずトリガーは、以下のように設定。
※公式リファレンスに記載のある「OnDeploymentRequested」だと問題が発生する場合があるけど、ひとまずこれで。
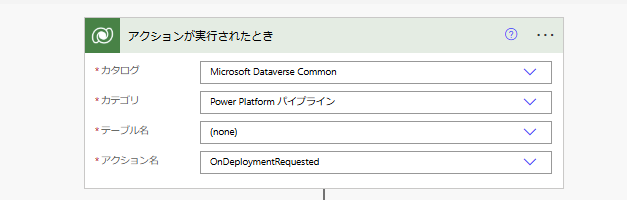
※公式リファレンスに記載のある「OnDeploymentRequested」だと問題が発生する場合があるけど、ひとまずこれで。
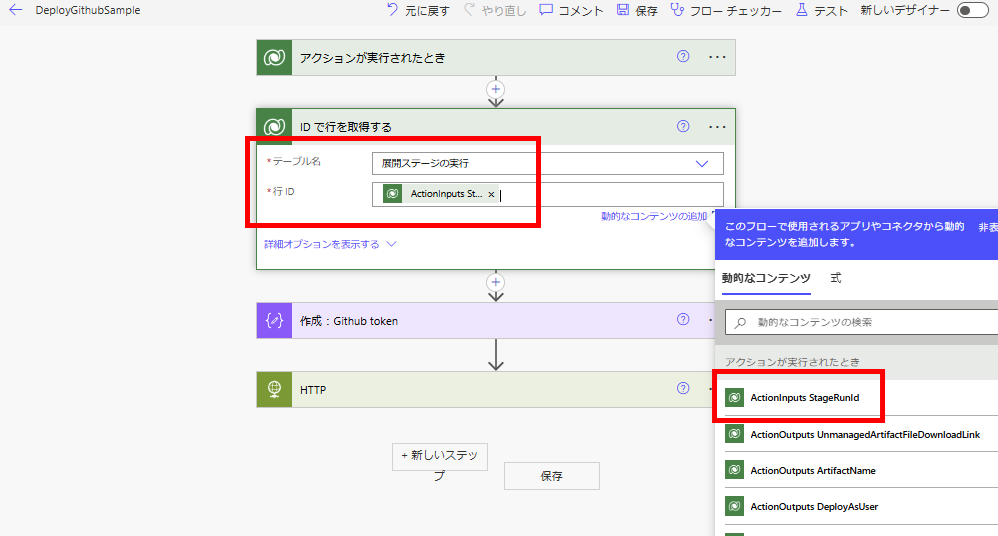
続いて「IDで行を取得する」アクションで、テーブル「展開ステージの実行」から行を取得。
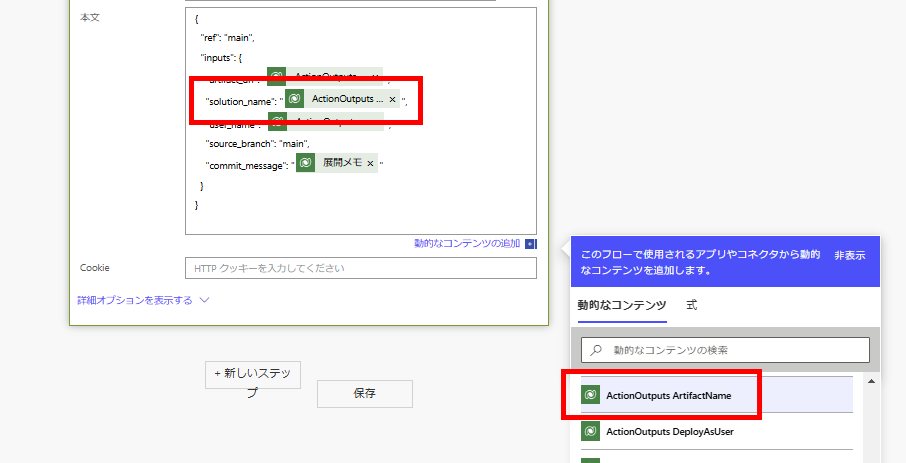
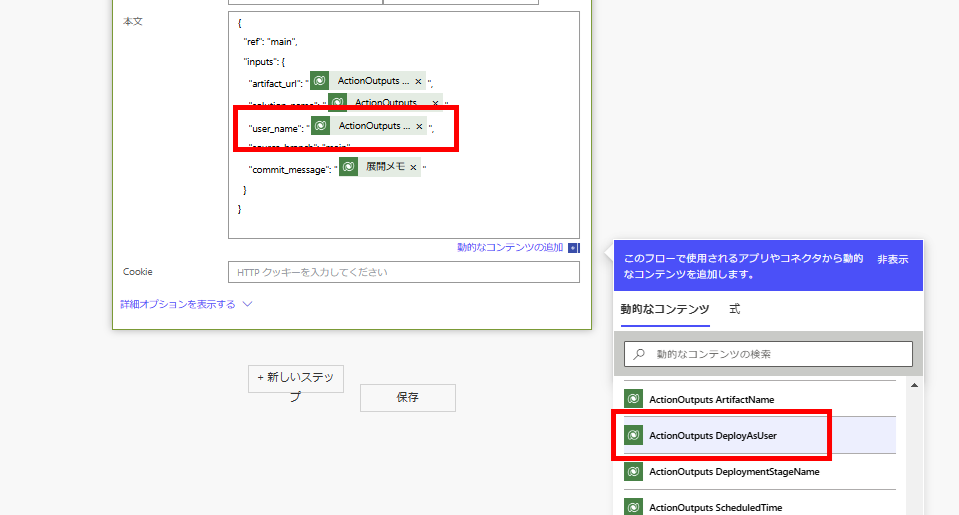
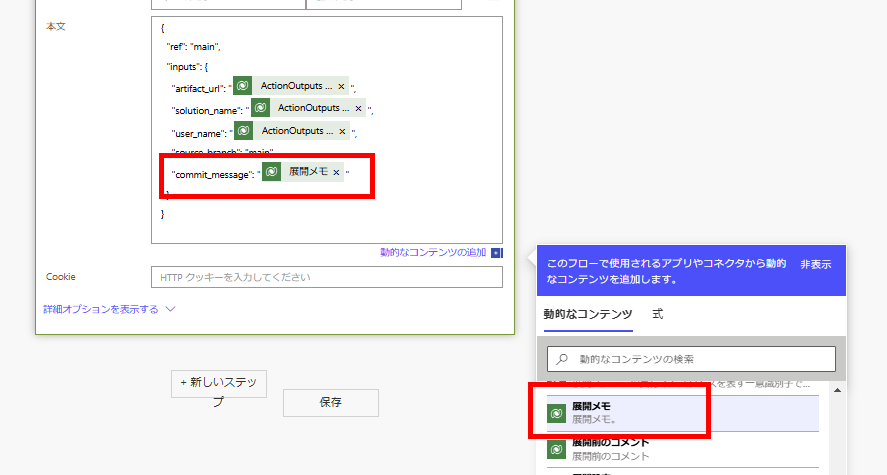
最後にHTTPアクションで、以下のURLにPOSTする。
URL:~~~/repos/【テナント(ユーザー)名】/【リポジトリ名】/actions/workflows/【ワークフローファイル名】/dispatches
ヘッダ:Authorization : Bearer 【Githubアクセストークン】
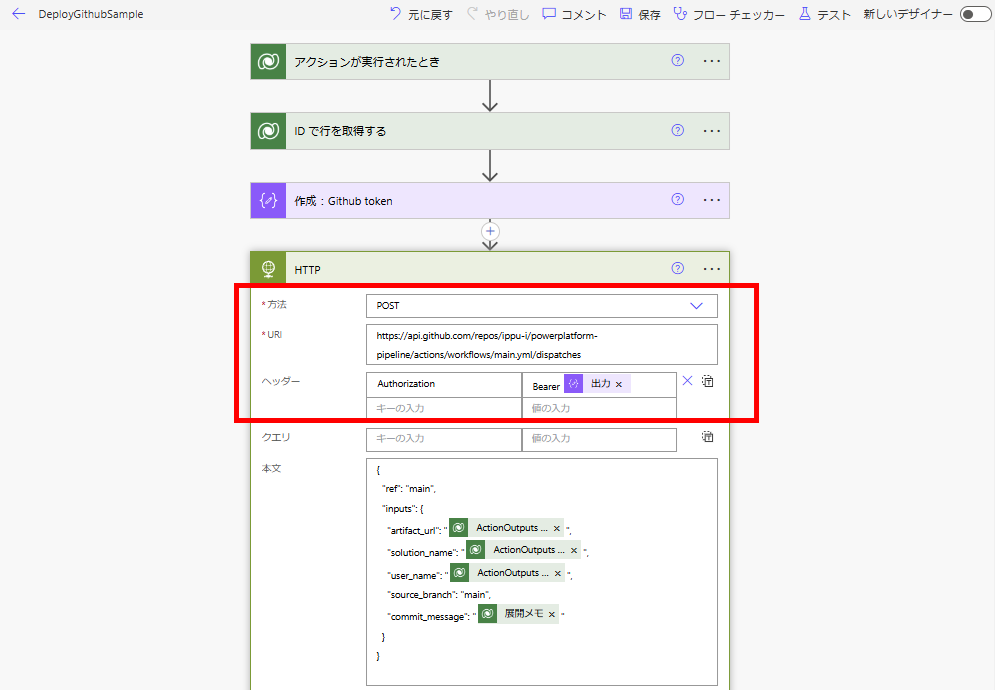
Bodyは以下の通り。 ※source_branchとtarget_branchは必要に応じて設定を変えてください。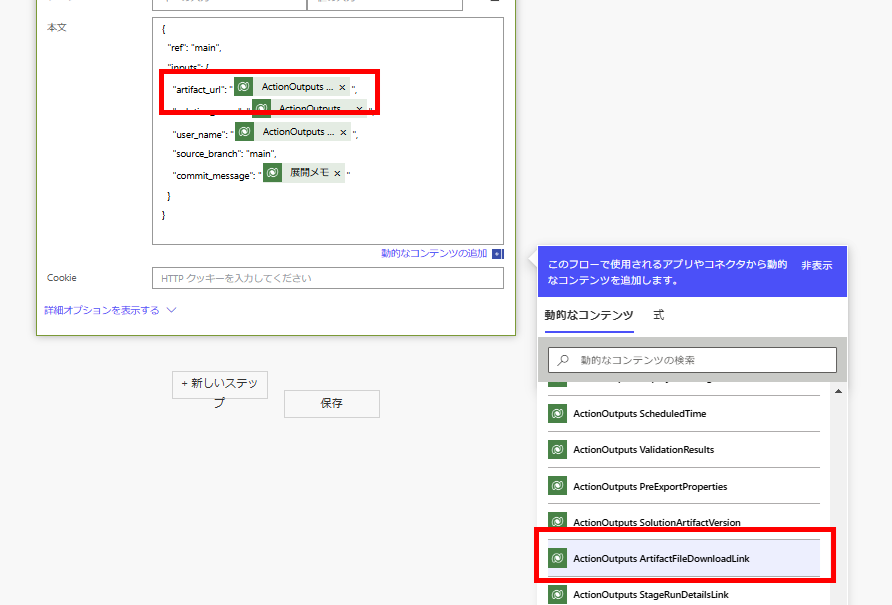
ちょっと長かったけど、以上で設定は完了。
URL:~~~/repos/【テナント(ユーザー)名】/【リポジトリ名】/actions/workflows/【ワークフローファイル名】/dispatches
ヘッダ:Authorization : Bearer 【Githubアクセストークン】
Bodyは以下の通り。 ※source_branchとtarget_branchは必要に応じて設定を変えてください。
{
"ref": "main",
"inputs": {
"artifact_url": "@{triggerOutputs()?['body/OutputParameters/ArtifactFileDownloadLink']}",
"solution_name": "@{triggerOutputs()?['body/OutputParameters/ArtifactName']}",
"user_name": "@{triggerOutputs()?['body/OutputParameters/DeployAsUser']}",
"source_branch": "main",
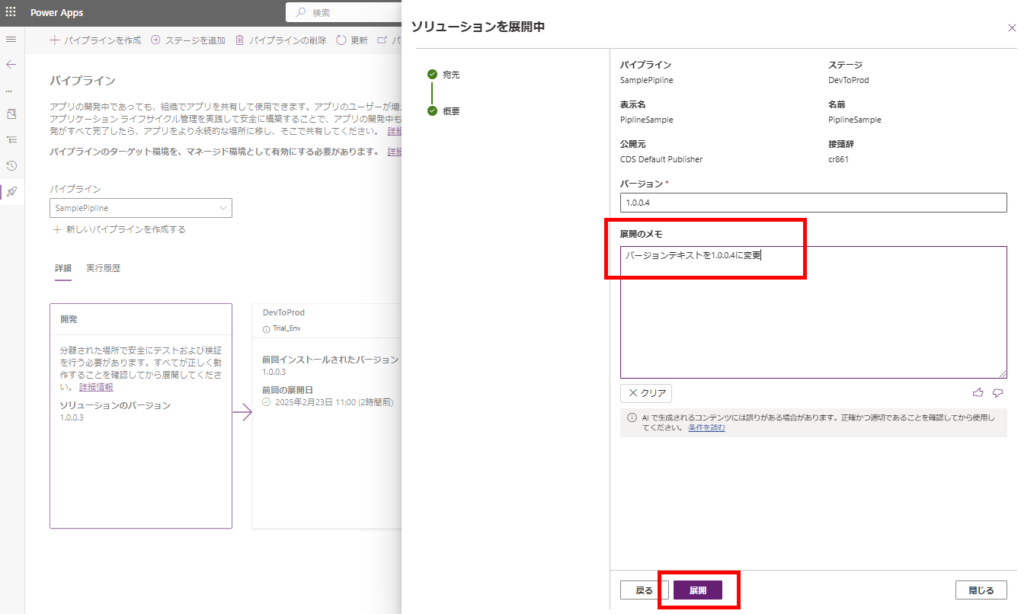
"commit_message": "@{outputs('ID_で行を取得する')?['body/deploymentnotes']}"
}
}
動作確認
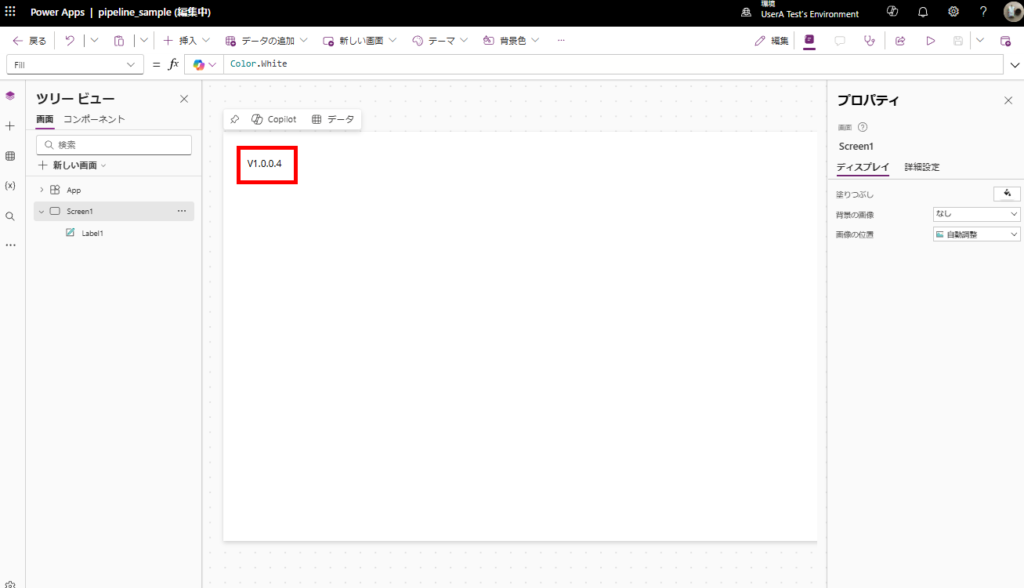
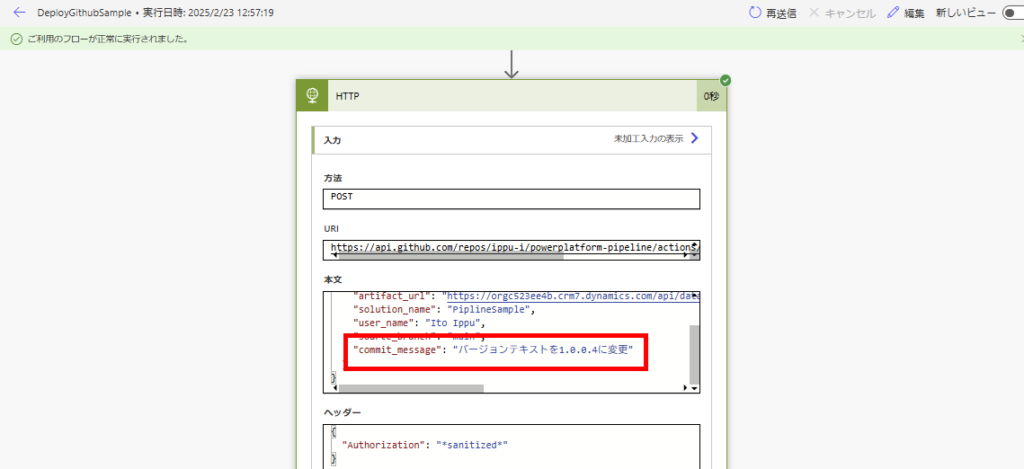
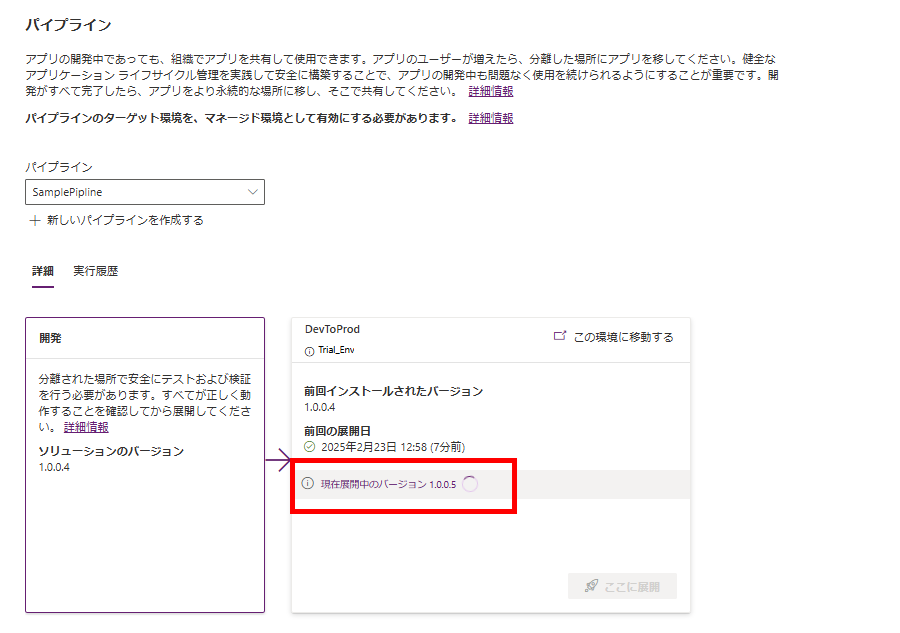
前回の記事で作成したソリューション内のキャンバスアプリのラベルの内容をv1.0.0.4に変更し、保存→公開する。
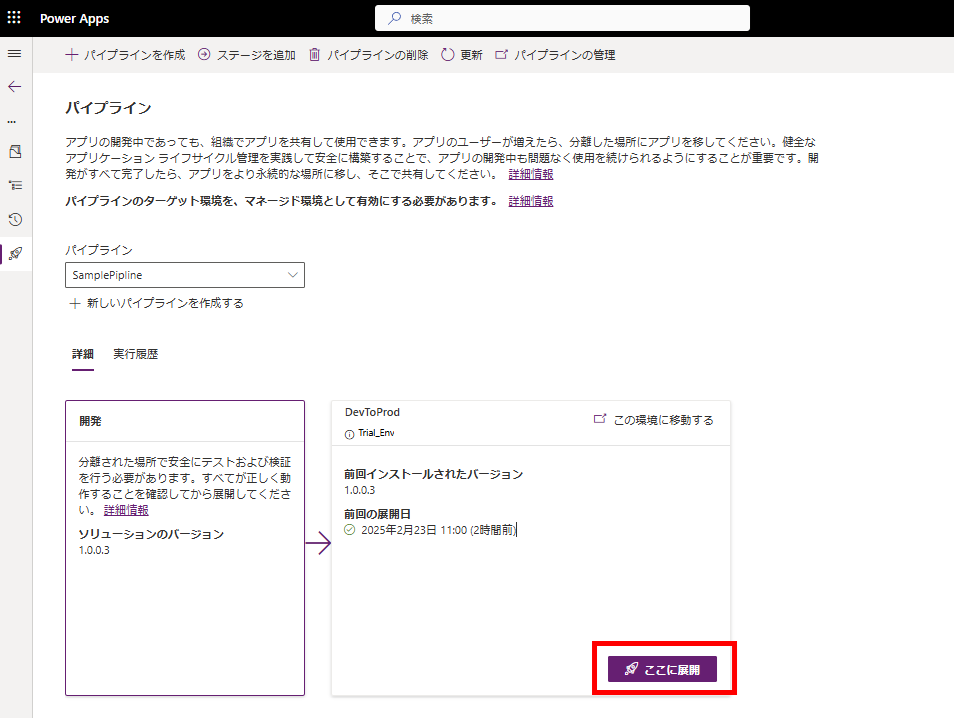
公開後、設定したパイプラインを起動すると、
Power Automateが動き、GitHubのActionsをコール。
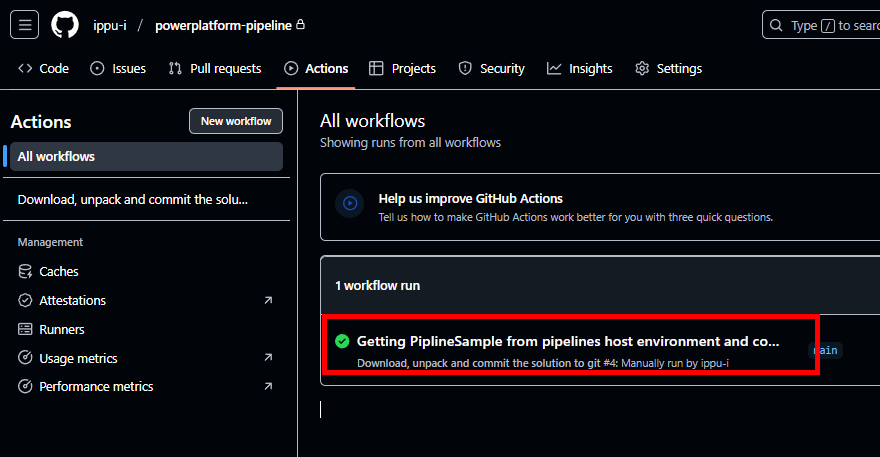
少し待つとGitHubのアクションが成功し、
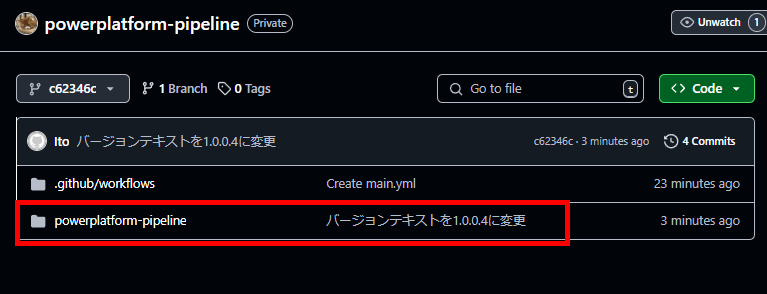
ソリューションの中身がGitHubに入る。
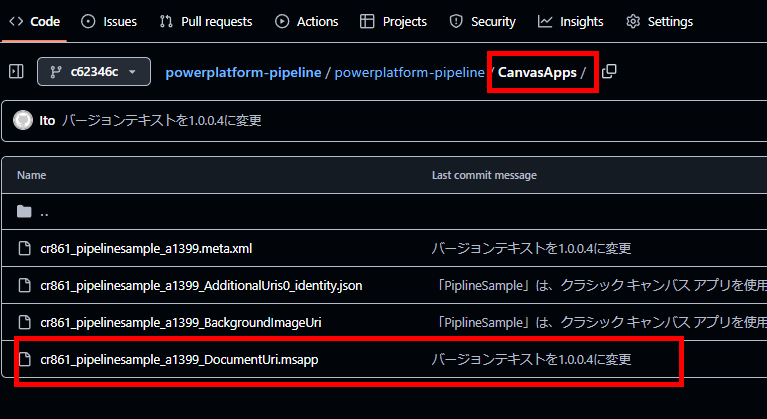
今回はキャンバスアプリの中身を変えたので、.msappの内容が無事更新されている。
Actionsが失敗することもある
全く同じ手順でパイプラインを動かし、
Power Automateまで無事動くけど、
GitHubのActionsが失敗することがある。
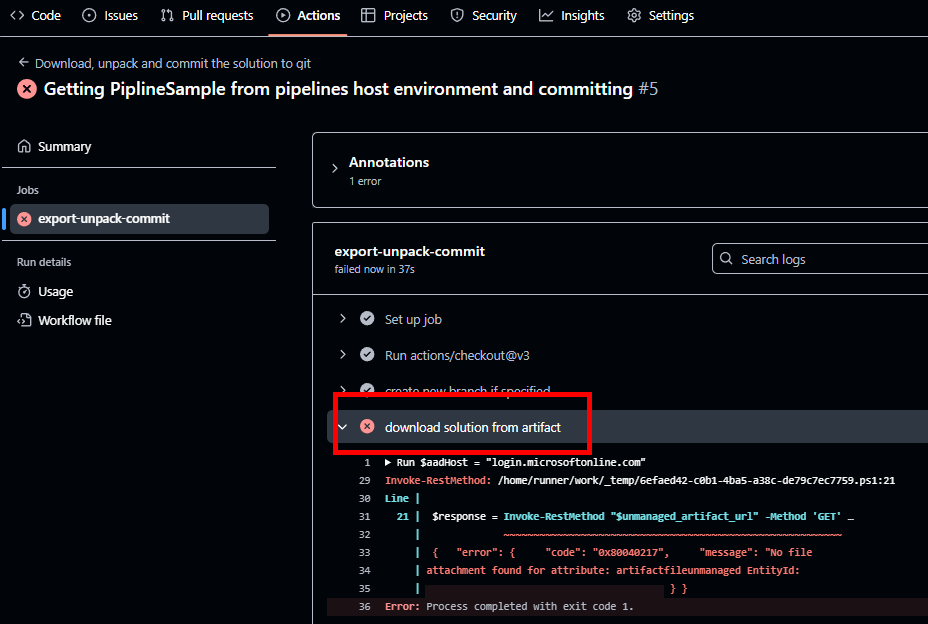
エラーメッセージ「No file attachment found for attribute」とある通り、これはGitHubのアクションでマネージドソリューションのzipを持ってこようとしたときに、まだパイプラインのソリューションのzip化が完了していないため、起きていると思われる。ちょっと長くなってしまったので、もしこれが起きた場合の対処方法については次回。
コメント